|
|
Continuing our series of sorting elements in a Collection, this post makes use of the Comparator interface to sort the objects.
Key Idea
The sort(List list, Comparator c) method sorts the specified (modifiable) list in the order specified by the comparator
The Employee Java Bean below makes use of the EmployeeNameComparator class to sort the Employee elements in the list. Also, note the use of NullSafeComparator
package com.samples;
public class Employee
{
private String empName = null;
private int empAge;
public Employee(String name, int age)
{
this.empName = name;
this.empAge = age;
}
public String getEmpName()
{
return empName;
}
public void setEmpName(String empName)
{
this.empName = empName;
}
public int getEmpAge()
{
return empAge;
}
public void setEmpAge(int empAge)
{
this.empAge = empAge;
}
}
package com.samples;
import java.awt.print.Printable;
import java.util.Arrays;
import java.util.Collections;
import java.util.Iterator;
import java.util.List;
public class EmployeeTest
{
public static void main(String args[])
{
Employee[] empArray = {
new Employee("Spiderman", 29),
new Employee("Superman", 30),
new Employee(null, 0),
new Employee("Batman", 35),
new Employee("Perry", 25)
};
List<Employee> list = Arrays.asList(empArray);
DebugPrint(list);
Collections.sort(list, new EmployeeNameComparator(new NullSafeComparator(new StringComparator(), true)));
DebugPrint(list);
Collections.sort(list, new EmployeeAgeComparator());
DebugPrint(list);
}
private static void DebugPrint(List<Employee> list)
{
System.out.println();
System.out.println("== DEBUG ==");
Iterator<Employee> itr = list.iterator();
while (itr.hasNext())
{
Employee emp = itr.next();
System.out.println("[Name]: " + emp.getEmpName() + "(" + emp.getEmpAge() + ")");
}
}
}
Important
The NullSafeComparator class prevents the program from crashing with NullPointerException when null is passed to the compareTo() function in StringComparator class. The class also takes care of the sorting of the null elements in the list
package com.samples;
import java.util.Comparator;
public class NullSafeComparator implements Comparator
{
private Comparator comparator;
private boolean nullsAreHigh;
public NullSafeComparator(Comparator comparator, boolean nullsAreHigh)
{
this.comparator = comparator;
this.nullsAreHigh = nullsAreHigh;
}
public int compare(Object o1, Object o2)
{
if(null == o1 && null == o2)return 0;
if(null == o1 && null != o2)return (nullsAreHigh ? 1 : -1);
if(null == o2 && null != o1)return (nullsAreHigh ? -1 : 1);
return comparator.compare(o1, o2);
}
}
package com.samples;
import java.util.Comparator;
public class EmployeeNameComparator implements Comparator<Employee>
{
private Comparator comparator;
public EmployeeNameComparator(Comparator comparator)
{
this.comparator = comparator;
}
public int compare(Employee o1, Employee o2)
{
return comparator.compare(o1.getEmpName(), o2.getEmpName());
}
}
package com.samples;
import java.util.Comparator;
public class StringComparator implements Comparator<String>
{
public int compare(String o1, String o2)
{
return o1.compareTo(o2);
}
}
package com.samples;
import java.util.Comparator;
public class EmployeeAgeComparator implements Comparator<Employee>
{
public EmployeeAgeComparator()
{
}
public int compare(Employee o1, Employee o2)
{
if(o1.getEmpAge() == o2.getEmpAge())
{
return 0;
}
return o1.getEmpAge() > o2.getEmpAge() ? 1 : -1;
}
}
The sample run of the program shows the Employee list sorted by name and then sorted by age.
Output: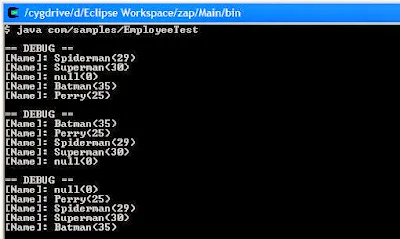
Read more ...
The Collections class in java provides the following methods for sorting the specified (modifiable) list. This post deals with the first method from the list.
void sort(List list)
void sort(List list, Comparator c)
Key Points
The sort(List list) method sorts the elements in ascending order according to the natural ordering of it's elements. The ordering is defined by implementing Comparable interface and overriding the compareTo() method. All the elements must implement Comparable interface and must be mutually comparable
Sorting elements using the Comparable Interface
The following example makes use of Person Java Bean to demonstrate the use of Comparable interface and sort in natural order
package com.samples;
public class Person implements Comparable<Person>
{
private String name;
private int age;
public Person(String name, int age)
{
this.name = name;
this.age = age;
}
public String getName()
{
return name;
}
public void setName(String name)
{
this.name = name;
}
public int getAge()
{
return age;
}
public void setAge(int age)
{
this.age = age;
}
Provides sorting algorithms with a comparison method for natural ordering
of Person elements
@Override
public int compareTo(Person p)
{
return this.name.compareTo(p.name);
}
}
package com.samples;
import java.util.Arrays;
import java.util.Collections;
import java.util.Iterator;
import java.util.List;
public class PersonTest
{
public static void main(String args[])
{
Person[] pArray = {
new Person("Superman", 30),
new Person("Spiderman", 35),
new Person("Hitman", 27),
new Person("Batman", 32),
new Person("Perry", 10)
};
List list = Arrays.asList(pArray);
DebugPrint(list);
Collections.sort(list);
DebugPrint(list);
}
private static void DebugPrint(List<Person> list)
{
System.out.println();
System.out.println("== DEBUG ==");
Iterator<Person> itr = list.iterator();
while (itr.hasNext())
{
Person p = itr.next();
System.out.println("[Name]: " + p.getName() + "(" + p.getAge() + ")");
}
}
}Output:
Read more ...
All Sql Server logins are stored in a system base table in master database. Whenever a new user is created, a corresponding entry is added in the system base table. There is a associated login entry for every user in system base table which also stores an associated SID (security identifier).
Key Idea
1. An orphan user is one which does not have an associated login entry in the System Base Tables (syslogins for sql server 2000 and sys.server_principals for sql server 2005+)
2. A user is also rendered orphan if the security identifier of the user does not match with the one stored in the system base tables in the master database
Orphaned users are generally created when you do either of the following:
1. Restore a database backup from one server to another
2. Restore an old copy of master database
3. Accidently remove a login belonging to a user
Reporting Orphaned Users
To see all the orphaned users in the database, execute the following query
sp_change_users_login 'report'
The orphan users if present will be shown as:
OrphanUser1 0x296D8B7BC71BA7459884FE8C17BFC32B
OrphanUser2 0x5F8AD799262298479F6F15FB07E9B0C6
Fixing Orphaned Users
To fix these orphaned users we have to relink the security identifier of the users with the security identifiers of the logins in the system base table. The below query helps fix and reset the password for the orphaned users
sp_change_users_login 'auto_fix', 'OrphanUser1', null, 'OrphanUser1'
sp_change_users_login 'auto_fix', 'OrphanUser2', null, 'OrphanUser2'
The above queries will add the login entries if not already present with the given password. In case the login entries are already present, you can use the shorter version of the above queries to fix the problem
sp_change_users_login 'auto_fix', 'OrphanUser1'
sp_change_users_login 'auto_fix', 'OrphanUser2'
Note: You may observe the following error: An invalid parameter or option was specified for procedure 'sys.sp_change_users_login' if you are using 'Auto_Fix' as the action instead of 'auto_fix'
References:
Troubleshooting Orphaned Users
MSDN: System Base Tables
Fixing Orphaned Users
Read more ...
Key Points
1. Only the thread which acquires the mutex can release the mutex successfully.
2. A binary semaphore (semaphore with a count of 1) is similar to mutex but allows other threads to release it.
A thread which owns a mutex can acquire the same mutex recursively without blocking it's execution. This prevents the thread from deadlocking itself while waiting for the mutex it already owns. To release it's ownership under such circumstances, the thread must release the mutex the same number of times it acquired it.
A semaphore is a synchronization object which maintains a count between zero and a maximum value. The count is decremented each time a thread acquires a semaphore and incremented when a thread releases the semaphore. When the semaphore count reaches 0, the thread attempting to acquire the semaphore will be blocked unless some other thread increments it. Thus, a semaphore is useful in limiting the number of threads sharing a resource.
Read more ...
In my earlier post Thread Synchronization in Windows using Critical Section, I have used Windows Critical Section as Locks for synchronizing the threads. This post talks about using Windows Mutex as synchronization objects and demonstrates it's use with a simple example. Windows functions related with Mutexes are CreateMutex, ReleaseMutex and OpenMutex
HANDLE CreateMutex(
  LPSECURITY_ATTRIBUTES lpMutexAttributes,
  BOOL bInitialOwner,
  LPCTSTR lpName
);
BOOL ReleaseMutex(
HANDLE hMutex
); HANDLE WINAPI OpenMutex(
DWORD dwDesiredAccess,
BOOL bInheritHandle,
LPCTSTR lpName
);
Key Points
1. A thread acquires a mutex by calling WaitForSingleObject(HANDLE hMutex, DWORD dwMilliseconds);
2. A thread releases mutes by calling ReleaseMutex(HANDLE hMutex);
3. The WaitForSingleObject call returns when the specified object is in the signaled state or when the time out interval has lapsed
The MutexLock class implementation using Windows Mutex synchronization Object
#ifndef _MutexLock_H_
#define _MutexLock_H_
#include <windows.h>
#include <process.h>
#include <iostream>
#include "NonCopyable.h"
namespace examples
{
class MutexLock : public NonCopyable
{
public:
MutexLock()
{
m_hMutex = (HANDLE) ::CreateMutex(0, 0, 0);
if(NULL == m_hMutex)
{
std::cout << "ERROR: Cannot create mutex" << std::endl;
}
}
~MutexLock()
{
::CloseHandle(m_hMutex);
}
void acquire()
{
if(::WaitForSingleObject(m_hMutex, INFINITE) != WAIT_OBJECT_0)
{
std::cout << "ERROR: Cannot acquire mutex" << std::endl;
}
}
bool tryAcquire(size_t timeOut)
{
bool retval = false;
switch(::WaitForSingleObject(m_hMutex, timeOut))
{
case WAIT_OBJECT_0:
retval = true;
break;
case WAIT_TIMEOUT:
std::cout << "ERROR: Cannot acquire mutex" << std::endl;
break;
default:
std::cout << "ERROR: Cannot acquire mutex" << std::endl;
break;
}
return retval;
}
void release()
{
if(::ReleaseMutex(m_hMutex) == 0)
{
std::cout << "ERROR: Cannot release mutex" << std::endl;
}
}
private:
HANDLE m_hMutex;
};
}
#endif
Read more ...
Above is class diagram for a simple producer/consumer problem
#include <iostream>
#include "MQ.h"
#include "Thread.h"
#include "Runnable.h"
#include "ProductionTask.h"
#include "ConsumptionTask.h"
using namespace examples;
int main()
{
try
{
MQ q(10);
ProductionTask producerTask(q);
ConsumptionTask consumerTask(q);
Thread t[2] = { producerTask, consumerTask };
t[0].start();
t[1].start();
t[0].join(50000);
t[1].join(50000);
std::cout << std::endl
<< "Threads timed out!!" << std::endl;
}catch(std::exception& e)
{
std::cerr << e.what() << std::endl;
}catch(...)
{
std::cerr << "Unknown Exception" << std::endl;
}
return 0;
}
Key Features
1. Threads are Tasks are decoupled. A thread can execute any task provided it implements the Runnable interface.
2. Windows threads are encapsulated using the technique demonstrated in the earlier blog post Encapsulating Windows Threads in C++ Objects
3. Two Tasks ProductionTask and ConsumptionTask share the common MQ instance q and try to execute add and remove operations on q concurrently. Synchronization is achieved here by means of Lock implemented using Windows CRITICAL_SECTION
4. The threads are allowed to run for 50 seconds before they are terminated. This is not a graceful termination and in real world applications may lead to unexpected results
#ifndef _Runnable_H_
#define _Runnable_H_
#include <iostream>
#include "NonCopyable.h"
namespace examples
{
class Runnable
{
public:
virtual ~Runnable(){}
virtual void run() = 0;
};
}
#endif
#ifndef _ConsumptionTask_H_
#define _ConsumptionTask_H_
#include "Runnable.h"
#include "MQ.h"
namespace examples
{
class ConsumptionTask : public Runnable
{
public:
ConsumptionTask(MQ &q);
~ConsumptionTask();
virtual void run();
private:
MQ& m_queue;
};
}
#endif
#include "ConsumptionTask.h"
using namespace examples;
ConsumptionTask::ConsumptionTask(MQ &q) : m_queue(q)
{}
ConsumptionTask::~ConsumptionTask()
{}
void ConsumptionTask::run()
{
while(true)
{
m_queue.remove();
::Sleep(550);
}
}
#ifndef _ProductionTask_H_
#define _ProductionTask_H_
#include "Runnable.h"
#include "MQ.h"
namespace examples
{
class ProductionTask : public Runnable
{
public:
ProductionTask(MQ &q);
~ProductionTask();
virtual void run();
private:
MQ& m_queue;
};
}
#endif
#include "ProductionTask.h"
using namespace examples;
ProductionTask::ProductionTask(MQ &q) : m_queue(q)
{}
ProductionTask::~ProductionTask()
{}
void ProductionTask::run()
{
while(true)
{
m_queue.add("Object");
::Sleep(500);
}
}
Read more ...
Threads in Windows can be created using the following three routines
HANDLE CreateThread(
LPSECURITY_ATTRIBUTES lpsa,
DWORD cbStack,
LPTHREAD_START_ROUTINE lpStartAddr,
LPVOID lpvThreadParam,
DWORD fdwCreate,
LPDWORD lpIDThread
);
uintptr_t _beginthread(
void( *start_address )( void * ),
unsigned stack_size,
void *arglist
); uintptr_t _beginthreadex(
void *security,
unsigned stack_size,
unsigned ( *start_address )( void * ),
void *arglist,
unsigned initflag,
unsigned *thrdaddr
);
//start_address: is the starting address of a routine that begins the execution of a new thread.
Key Points
1. The above routines expects a pointer to the application defined function which would be the entry point or starting address of the thread.
2. A static member function does not have access to the this pointer of the class whereas the member functions have an implicit parameter which points to the object (the this pointer)
3. A static member function is same as an ordinary C function
4. You should not pass pointer to a member function to a system call that starts a thread. A member function is meaning less without an object to invoke it
The threads in windows can be encapsulated using a static member function which acts as the entry point of the thread and passing the this pointer as the function argument. The ThreadImpl class shown below uses static unsigned __stdcall dispatch(void *); method as the thread start address.
#ifndef _Thread_H_
#define _Thread_H_
#include "NonCopyable.h"
namespace examples
{
class Thread : public NonCopyable
{
public:
Thread();
Thread(const char *);
~Thread();
bool join();
bool join(size_t ms);
void start();
void setName(const std::string&);
const char* getName() const;
private:
class ThreadImpl *m_impl;
};
}
#endif
#ifndef _ThreadImpl_H_
#define _ThreadImpl_H_
#include <windows.h>
#include <process.h>
#include <iostream>
#include <string>
#include "NonCopyable.h"
namespace examples
{
class ThreadImpl : public NonCopyable
{
public:
ThreadImpl();
ThreadImpl(const std::string&);
~ThreadImpl();
bool join() const;
bool join(size_t) const;
void start() const;
void setName(const std::string&);
const char* getName() const;
private:
static unsigned __stdcall dispatch(void *);
void run();
bool spawn();
HANDLE m_hthread;
unsigned m_thrdid;
std::string m_thrName;
};
}
#endif
Read more ...
With the introduction of exceptions, writing code has become increasingly complex. Any resource acquired has to be released when no longer in use. If not handled properly will lead to handle leaks, memory leaks and in some cases deadlocks which are very difficult to debug.
Guard classes takes advantage of the fact that the destructor is always called for an object on the stack regardless of how you exit from the function scope.
Key Idea
unsigned __stdcall func(void *args)
{
static Lock lock;
Guard guard(lock);
return 0;
}
#ifndef _Guard_H_
#define _Guard_H_
#include "Lock.h"
namespace examples
{
class Guard
{
public:
Guard(Lock &lock) : m_lock(lock)
{
m_lock.acquire();
}
~Guard()
{
m_lock.release();
}
private:
Guard();
Guard(const Guard&);
Guard& operator=(const Guard&);
Lock &m_lock;
};
}
#endif
The program demonstrates the use of Guard class to acquire() and release() the lock
Read more ...
The program is supposed to print multiples of 10 in a new line in increasing order. Although, the program appears to be correct, it is not. It is giving me duplicate values in the output. Locate the problem?
 #include <windows.h>
#include <process.h>
#include <iostream>
#include <assert.h>
#include "Lock.h"
using namespace examples;
static bool alive = true;
static int current = 0;
unsigned __stdcall put(void *args)
{
Lock lock;
while(alive)
{
lock.acquire();
current = current + 10;
::Sleep(500);
std::cout << current << std::endl;
lock.release();
}
return 0;
}
int main()
{
unsigned t1;
HANDLE h1 = (HANDLE) ::_beginthreadex(0, 0, &put, 0, CREATE_SUSPENDED, &t1);
assert(h1 != 0);
unsigned t2;
HANDLE h2 = (HANDLE) ::_beginthreadex(0, 0, &put, 0, CREATE_SUSPENDED, &t2);
assert(h2 != 0);
::ResumeThread(h1);
::ResumeThread(h2);
::Sleep(10000);
alive = false;
::WaitForSingleObjectEx(h1, INFINITE, false);
::WaitForSingleObjectEx(h2, INFINITE, false);
::CloseHandle(h1);
::CloseHandle(h2);
return 0;
}
Read more ...
In multi threaded environments, where more than one thread operates on the shared data (global variables, collections) the results can be unpredictable due to race conditions. Critical Section is a mechanism that ensures that only one thread executes a particular piece of the code. A thread, once it enters a critical section should not be interrupted. Critical Sections have the advantage of not being kernel objects and are maintained in user space. This usually, but not always, provides performance improvements. The CRITICAL_SECTION data type is basically a structure whose fields are used only internally to Windows
Windows provide four functions for using critical sections. To use these functions, you must define an object of type CRITICAL_SECTION. Key Points
1. Define a CRITICAL_SECTION object cs
2. Initialize a Critical section using InitializeCriticalSection (&cs);
3. After the critical section object has been initialized, a thread enters the critical section by calling EnterCriticalSection(&cs); No two threads can own the critical section at the same time
4. A thread leaves the critical section by calling LeaveCriticalSection (&cs);
5. When the critical section object is no longer needed, it can be deleted by the program by calling DeleteCriticalSection (&cs);
#ifndef _Lock_H_
#define _Lock_H_
#include <windows.h>
namespace examples
{
class Lock
{
public:
Lock()
{
::InitializeCriticalSection(&m_cs);
}
~Lock()
{
::DeleteCriticalSection(&m_cs);
}
void acquire()
{
::EnterCriticalSection(&m_cs);
}
void release()
{
::LeaveCriticalSection(&m_cs);
}
private:
Lock(const Lock&);
Lock& operator=(const Lock&);
CRITICAL_SECTION m_cs;
};
}
#endif
Read more ...
A thread is an independent unit of execution within a process. Threads under windows can be created/terminated using the following Win API functions:
1. CreateThread()/ExitThread() system calls.
2. _beginthread()/_endthread() OR _beginthreadex()/_endthreadex() CRT functions.
Key Points
1. Using CreateThread() in a program that uses the CRT functions (for example, links with LIBCMT.LIB) may cause a memory leak of about 70-80 bytes each time a thread is terminated.
2. _beginthread()/_endthread() CRT functions provide a simpler interface but should be avoided. _beginthread() does not have a security attribute, and does not return a thread id. More importantly, it closes the handle of the thread it creates, and the returned thread handle may be invalid by the time the parent thread stores it. If the thread spawned by _beginthread() exits quickly, the handle returned to the caller of _beginthread() may be invalid or, worse, point to another thread. Also avoid _endthread() it does not allow for a return value.
3. With _beginthreadex(), you can use security information, set the initial state of the thread (running or suspended), and get the thread identifier of the newly created thread. You are also able to use the thread handle returned by _beginthreadex() with the synchronization APIs.
4. _endthread() or _endthreadex() is called automatically when the thread returns from the routine passed as a parameter
The example code creates three independent threads using _beginthreadex() in suspended state scheduled to run for 10, 20 & 30 seconds. The threads resume execution after the call to ResumeThread(). The WaitForSingleObject() waits for the given thread for passed slice of time. The function returns with value 0 if the thread terminates by self and by value 258 if a thread's execution is timed out
Read more ...
|
|


