A Developer's Diary

Showing posts with label Visual Studio. Show all posts

Dec 22, 2012

Sharepoint 2010 - Access denied Exception

The below code retrieves sharepoint SPList item when executed through a .net console application. The same piece of code when run through ASP.NET application throws Access is denied exception.

SPWeb web = GetWeb(SiteURL);
return web.Lists[ListName];
The exception message through the visual studio watch window
{"Access is denied. (Exception from HRESULT: 0x80070005 (E_ACCESSDENIED))"} System.Exception {System.UnauthorizedAccessException}
To fix this problem, you need to run the above snippet with elevated privileges using SPSecurity.RunWithElevatedPrivileges
SPList list = null;
SPSecurity.RunWithElevatedPrivileges(delegate()
{
    SPWeb web = GetWeb(SiteURL);
    list = web.Lists[ListName];
});

return list;

Read more ...

Apr 5, 2009

Visual Studio - Creating custom icon for your Visual Studio Add-In (plugin)


The Add-In Wizard creates an Add-In which has smiley icon by default. This is not what you may want to have while developing enterprise applications.

You can add a custom icon to your Visual Studio Add-In by -

1. Place your custom icon bitmap as resource in your satellite dll file
2. Refering to the Id number of this resource
3. Modifying your AddNamedCommand2() function to set MSOButton parameter to false


Step 1: Add a New Resource Item to your Addin Project


Step 2: Click on Show All Files on tool bar of solution explorer


Step 3: Open Resource1.resx Properties and select build action to none


Step 4: Creating your custom Bitmap image

Open the resource editor and a new bmp image


Let the image name be 'Image1'


This opens your bitmap editor


Change the image properties to 16x16 pixels and Appearance set to True Color


Edit the picture in the editor


Step 5: Modify AddNamedCommand2() method to set MSOButton property to false and refer to id of your resource. In our case we have set it to '1'


public void OnConnection(object application, ext_ConnectMode connectMode,
object addInInst, ref Array custom)
{
_applicationObject = (DTE2)application;
_addInInstance = (AddIn)addInInst;
if(connectMode == ext_ConnectMode.ext_cm_UISetup)
{
object[] contextGUIDS = new object[] { };
Commands2 commands = (Commands2)_applicationObject.Commands;
CommandBar bar = ((CommandBars)_applicationObject.CommandBars)["MenuBar"];

try

{
Command command = commands.AddNamedCommand2(
_addInInstance, "MyAddin1", "Demo", "Do Something", false, 1,
ref contextGUIDS, (int)vsCommandStatus.vsCommandStatusSupported +
(int)vsCommandStatus.vsCommandStatusEnabled,
(int)vsCommandStyle.vsCommandStylePictAndText,
vsCommandControlType.vsCommandControlTypeButton);

//Add a control for the command to the tools menu

if(command != null){
command.AddControl(bar, 1);
}
}
catch(System.ArgumentException){
}
}
}


Step 6: Right-click the Resource1.resx file in Solution Explorer and select 'Exclude From Project'


Step 7: Select 'Save All' in the 'File' menu and build the solution

Step 8: Open Resource1.resc file in your notepad. Search for all instances of 'Image1' and change them to '1'. Save the file


<data name="1" type="System.Resources.ResXFileRef, System.Windows.Forms">

<value>Resources\1.bmp;System.Drawing.Bitmap, System.Drawing, Version=2.0.0.0, Culture=neutral, PublicKeyToken=b03f5f7f11d50a3a</value>
</data>


Step 9: Rename the Image1.bmp file in the Resources folder of your Add-In to '1.bmp'


Step 10: Build the satellite Dll using the following two commands


Resgen Resource1.resx


Al.exe /embed:Resource1.resources /culture:en-US /out:.resources.dll


Step 11: Create a new folder 'en-US' under the add-in's dll directory (/bin) as we typed en-US in culture information for Al.exe

Step 12: Copy .resources.dll to the en-US folder

Step 13: Run the Add-In project and you will find your custom icon in the menu bar


Read more ...

Visual Studio - Writing a Add-In (plugin) with context menus

The following example demonstrates how to write a plug-in, clicking on which pops up a context menus with menu items as show in the figure


Follow the steps mentioned in the post to write a simple plugin 'Demo'. Create a new file 'MyMenuItem.cs' with the following content.


using System;
using System.Collections.Generic;
using System.Text;
using System.Windows.Forms;

namespace MyAddin1
{
internal class MyMenuItem : MenuItem
{
public MyMenuItem(String name)
: this(name, name, null, 0)
{
}

public MyMenuItem(String name, String text, EventHandler eh, int id)
: base(text, eh)
{
m_name = name;
m_id = id;
}

public String MenuName
{
get { return m_name; }
set { m_name = value; }
}

public int MyMenuID
{
get{ return m_id; }
}

private String m_name;
private int m_id;
}
}


Add another file 'MyMenu.cs'

using System;
using System.Collections.Generic;
using System.Text;

using System.Windows.Forms;
using System.Collections;

namespace MyAddin1
{
internal class MyMenu : ContextMenu
{
public MyMenu()
{
m_stackMenu = new Stack();
m_stackMenu.Push(MenuItems);
}

public Menu.MenuItemCollection CurrentMenu
{
get { return (Menu.MenuItemCollection)m_stackMenu.Peek(); }
}

public void Add(String name, String text, int id)
{
CurrentMenu.Add(new MyMenuItem(name, text, m_eh, id));
}

public void PopAll()
{
m_stackMenu.Clear();
m_stackMenu.Push(MenuItems);
}

public void PopMenu()
{
m_stackMenu.Pop();
}

public MyMenuItem PushMenu(String name, EventHandler eh)
{
m_menuitem = new MyMenuItem(name, name, eh, 0);
CurrentMenu.Add(m_menuitem);
m_stackMenu.Push(m_menuitem.MenuItems);
return m_menuitem;
}

public EventHandler EventHandler
{
get { return m_eh; }
set { m_eh = value; }
}

private Stack m_stackMenu;
private EventHandler m_eh;
private MyMenuItem m_menuitem;
}
}


Modify the OnConnection method in the file Connect.cs to make the add-in visible in the 'MenuBar' at the position 1

public void OnConnection(object application, ext_ConnectMode connectMode,
object addInInst, ref Array custom)
{
_applicationObject = (DTE2)application;
_addInInstance = (AddIn)addInInst;
if(connectMode == ext_ConnectMode.ext_cm_UISetup)
{
object[] contextGUIDS = new object[] { };
Commands2 commands = (Commands2)_applicationObject.Commands;
CommandBar bar = ((CommandBars)_applicationObject.CommandBars)["MenuBar"];

try

{
Command command = commands.AddNamedCommand2(
_addInInstance, "MyAddin1", "Demo", "Do Something", true, 59,
ref contextGUIDS, (int)vsCommandStatus.vsCommandStatusSupported +
(int)vsCommandStatus.vsCommandStatusEnabled,
(int)vsCommandStyle.vsCommandStylePictAndText,
vsCommandControlType.vsCommandControlTypeButton);

//Add a control for the command to the tools menu:

if(command != null)
{
command.AddControl(bar, 1);
}
}
catch(System.ArgumentException){
}
}
}


Modify Exec() method which executes whenever the command is invoked

public void Exec(string commandName, vsCommandExecOption executeOption,
ref object varIn, ref object varOut, ref bool handled)
{
handled = false;
if(executeOption == vsCommandExecOption.vsCommandExecOptionDoDefault)
{
if(commandName == "MyAddin1.Connect.MyAddin1")
{
ShowMenu();
handled = true;
return;
}
}
}


The ShowMenu() lists the down how the context menu structure should look like

private void ShowMenu()
{
Point pt;

try
{
CommandBar bar = ((CommandBars)_applicationObject.CommandBars)["Demo"];
CommandBarControl control = bar.Controls[1];
pt = new Point(control.Left, control.Top);
}
catch(Exception){
pt = Control.MousePosition;
}

Control window = new Control();
window.CreateControl();

MyMenu menu = new MyMenu();
// Register event handler with MyMenu

menu.EventHandler = new EventHandler(this.OnClick);

menu.PushMenu("GroupOne", menu.EventHandler);
menu.PushMenu("GroupOneMenu", menu.EventHandler);
menu.PopMenu();
menu.PopMenu();

menu.PushMenu("GroupTwo", menu.EventHandler);
menu.PushMenu("GroupTwoMenu", menu.EventHandler);
menu.PopMenu();
menu.PopMenu();

menu.PushMenu("GroupThree", menu.EventHandler);
menu.PushMenu("GroupThreeMenu1", menu.EventHandler);
menu.PushMenu("GroupThreeMenu2", menu.EventHandler);
menu.PushMenu("GroupThreeMenu3", menu.EventHandler);
menu.PopAll(); // either call PopMenu() 4 times or PopAll()

menu.Add("MenuItem1", "MenuItem1", -1);
menu.Add("MenuItem2", "MenuItem2", -2);
menu.Add("AboutDemo", "AboutMenu", -3);

menu.Show(window, pt); //displays context menu

}


Handling Click events on MenuItems

private void OnClick(Object sender, EventArgs e)
{
try
{
MyMenuItem mi = (MyMenuItem)sender;
MessageBox.Show("Hello from " + mi.MenuName);
}
catch(Exception ex){
MessageBox.Show(ex.Message, ex.Source);
}
}


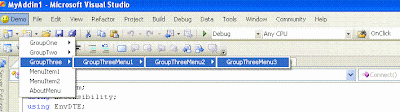
Now select the Menu Item from the GroupThree


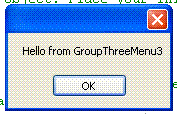
You see a message box with the message 'Hello from GroupThreeMenu3'


Your plugin is working as expected. Cheers !! :)

Read more ...

Apr 3, 2009

Visual Studio - Writing a simple Add-In (plugin)

An add-in is an extension which integrates with the Visual Studio environment and provides new functionality to it. An add-in has full access to Visual Studio (IDE) tools and APIs and can interact with them. An add-in is a compiled DLL file which can be loaded by Visual Studio when it starts.


Creating a Sample Add-In
1. Create a New → Project
2. Select Other Project Types → Extensibility → Visual Studio Add-in


3. An Add-In wizard pops up which will guide you through a series of 7 steps including the welcome page to configure your add-in


Select for creating a 'Tools' menu item. This will list the add-in in tools menu items


On clicking finish, three main files are generated for you
a) CommandBar.resx (Resource File)
b) Connect.cs (Main class file for Add-In logic)
c) WizardSample.AddIn (XML Configuration file for your add-in)


Build the solution and run the project. You will see a Visual Studio instance running within the visual studio. Click on 'Tools' and you can find your Add-In there.


Modify the function OnConnection() as below to add the plugin to 'MenuBar'


public void OnConnection(object application, ext_ConnectMode connectMode,
object addInInst, ref Array custom)
{

_applicationObject = (DTE2)application;
_addInInstance = (AddIn)addInInst;
if(connectMode == ext_ConnectMode.ext_cm_UISetup)
{
object []contextGUIDS = new object[] { };
Commands2 commands = (Commands2)_applicationObject.Commands;
CommandBar bar = ((CommandBars)_applicationObject.CommandBars)["MenuBar"];

try{
Command command = commands.AddNamedCommand2(
_addInInstance, "MyAddin1", "Demo", "Do Something", true, 59,
ref contextGUIDS,(int)vsCommandStatus.vsCommandStatusSupported+
(int)vsCommandStatus.vsCommandStatusEnabled,
(int)vsCommandStyle.vsCommandStylePictAndText,
vsCommandControlType.vsCommandControlTypeButton);

//Add a control for the command to the tools menu:

if(command != null) {
command.AddControl(bar, 1);
}
}
catch(System.ArgumentException){
}
}
}


Modify Exec() function to add some functionality to the plugin

public void Exec(string commandName, vsCommandExecOption executeOption,
ref object varIn, ref object varOut, ref bool handled)
{
handled = false;
if(executeOption == vsCommandExecOption.vsCommandExecOptionDoDefault)
{
if(commandName == "MyAddin1.Connect.MyAddin1")
{
handled = true;
MessageBox.Show("Hello from Demo AddIn");

return;
}
}
}


Read more ...