|
|
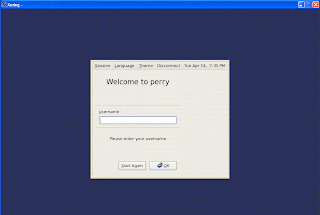
The GDM display manager implements all significant features required for managing attached and remote displays.
The GDM daemon can be configured to listen for and manage X Display Manage Protocol (XDMCP) requests from remote displays.
GDM has a number of configuration interfaces. These include scripting integration points, daemon configuration, greeter configuration, general session settings, integration with gnome-settings-daemon configuration, and session configuration.
By default XDMCP support is turned off, but can be enabled if desired.
Daemon Configuration for XDMCP
The GDM daemon is configured using the /etc/gdm/custom.conf file. Default values are stored in GConf in the gdm.schemas file. It is recommended that end-users modify the /etc/gdm/custom.conf file because the schemas file may be overwritten when the user updates their system to have a newer version of GDM.
Note that older versions of GDM supported additional configuration options which are no longer supported in the latest versions of GDM.
The /etc/gdm/custom.conf supports the "[daemon]", "[security]", and "[xdmcp]" group sections
To enable XDMCP Support add the following in custom.conf file
[xdmcp]
Enable=true
[security]
DisallowTCP=false
AllowRemoteRoot=true
Restart X Windows using the command gdm-restart
Connecting to GDM through XMing X Server
Step1: Download XMing X Server executable for Windows from here and install it.
Step2: Launch XLaunch. Select Fullscreen
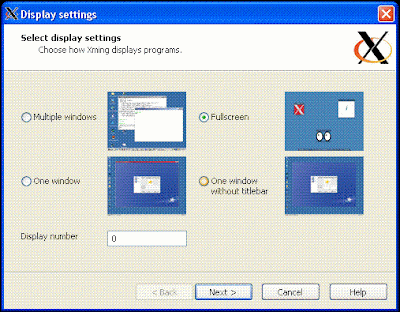
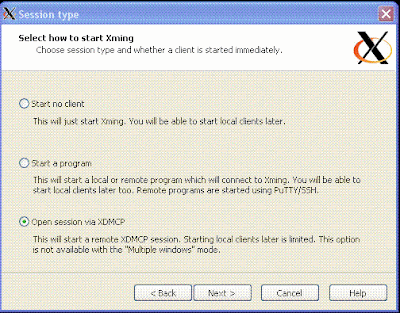
Step3: Select Open Session via XDMCP
Step4: Enter hostname or ip address
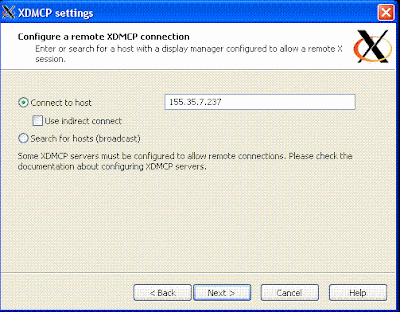
Step5: Click Next
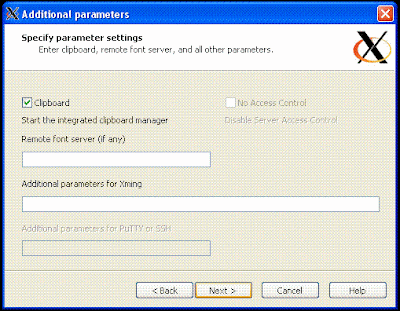
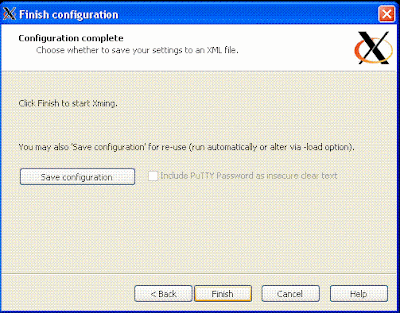
Step6: Click Finish
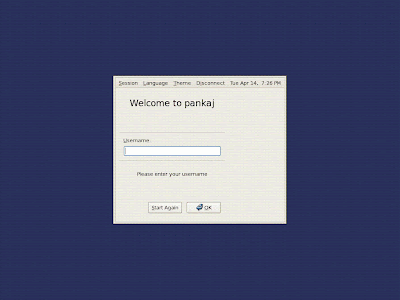
Step7: You have successfully connected through XMing
References:
1. GNOME Documentation
2. Comparing XDM, GDM, KDM and WDM
Read more ...
awk is a small powerful tool for processing column oriented text data.
Suppose I have file Marks.txt whose contents are
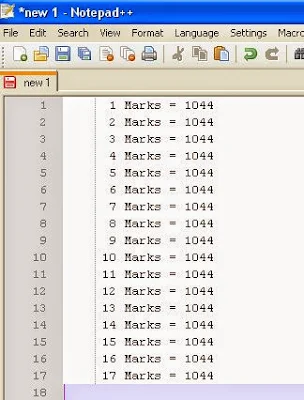
Use the following command to calculate the sum of the entries in column 3
cat Marks.txt | awk '{sum+=$3} END {print "Total=", sum}'
To get the average, use the following command
cat Marks.txt | awk '{sum+= $3} END {print "Average=", sum/NR}'
Read more ...
The Add-In Wizard creates an Add-In which has smiley icon by default. This is not what you may want to have while developing enterprise applications.
You can add a custom icon to your Visual Studio Add-In by -
1. Place your custom icon bitmap as resource in your satellite dll file
2. Refering to the Id number of this resource
3. Modifying your AddNamedCommand2() function to set MSOButton parameter to false
Step 1: Add a New Resource Item to your Addin Project
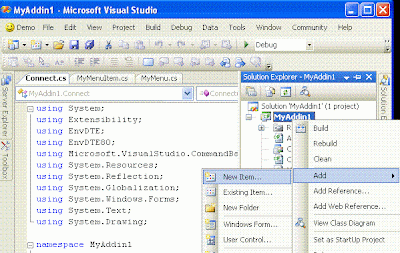
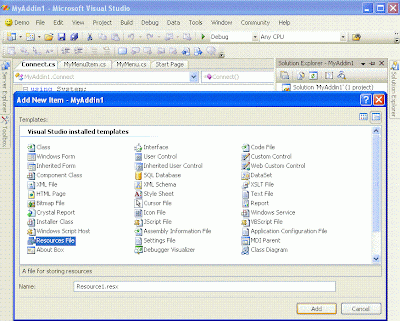
Step 2: Click on Show All Files on tool bar of solution explorer
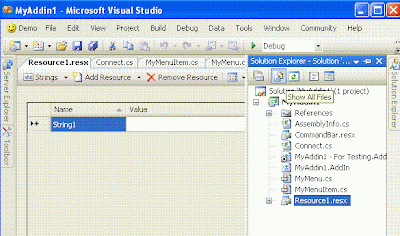
Step 3: Open Resource1.resx Properties and select build action to none
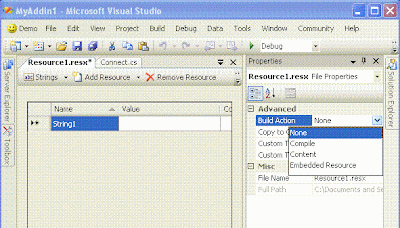
Step 4: Creating your custom Bitmap image
Open the resource editor and a new bmp image
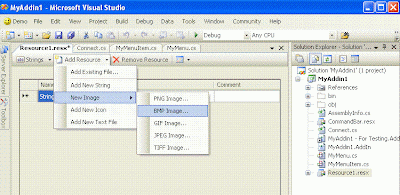
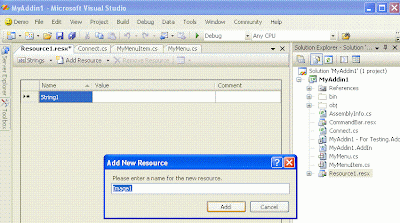
Let the image name be 'Image1'
This opens your bitmap editor
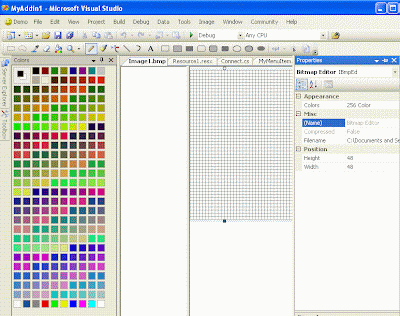
Change the image properties to 16x16 pixels and Appearance set to True Color
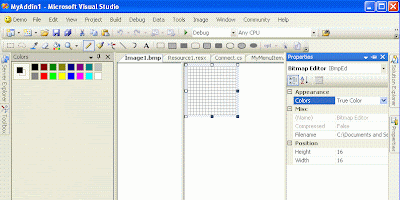
Edit the picture in the editor
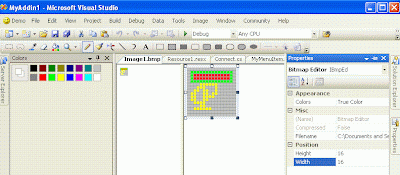
Step 5: Modify AddNamedCommand2() method to set MSOButton property to false and refer to id of your resource. In our case we have set it to '1'
public void OnConnection(object application, ext_ConnectMode connectMode,
        object addInInst, ref Array custom)
{
    _applicationObject = (DTE2)application;
    _addInInstance = (AddIn)addInInst;
    if(connectMode == ext_ConnectMode.ext_cm_UISetup)
    {
        object[] contextGUIDS = new object[] { };
        Commands2 commands = (Commands2)_applicationObject.Commands;
        CommandBar bar = ((CommandBars)_applicationObject.CommandBars)["MenuBar"];

        try

        {
            Command command = commands.AddNamedCommand2(
                    _addInInstance, "MyAddin1", "Demo", "Do Something", false, 1,
                    ref contextGUIDS, (int)vsCommandStatus.vsCommandStatusSupported +
                    (int)vsCommandStatus.vsCommandStatusEnabled,
                    (int)vsCommandStyle.vsCommandStylePictAndText,
                    vsCommandControlType.vsCommandControlTypeButton);

            //Add a control for the command to the tools menu

            if(command != null){
                command.AddControl(bar, 1);
            }
        }
        catch(System.ArgumentException){
        }
    }
}
Step 6: Right-click the Resource1.resx file in Solution Explorer and select 'Exclude From Project'
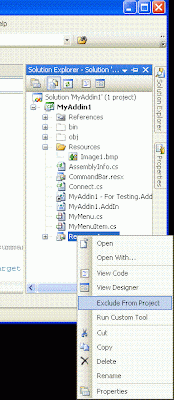
Step 7: Select 'Save All' in the 'File' menu and build the solution
Step 8: Open Resource1.resc file in your notepad. Search for all instances of 'Image1' and change them to '1'. Save the file
<data name="1" type="System.Resources.ResXFileRef, System.Windows.Forms">

        <value>Resources\1.bmp;System.Drawing.Bitmap, System.Drawing, Version=2.0.0.0, Culture=neutral, PublicKeyToken=b03f5f7f11d50a3a</value>
</data>
Step 9: Rename the Image1.bmp file in the Resources folder of your Add-In to '1.bmp'
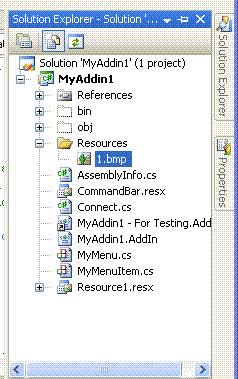
Step 10: Build the satellite Dll using the following two commands
Resgen Resource1.resx
Al.exe /embed:Resource1.resources /culture:en-US /out:.resources.dll

Step 11: Create a new folder 'en-US' under the add-in's dll directory (/bin) as we typed en-US in culture information for Al.exe
Step 12: Copy .resources.dll to the en-US folder
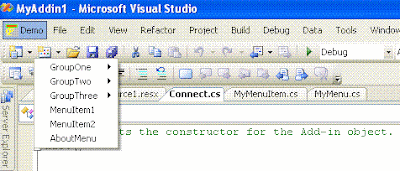
Step 13: Run the Add-In project and you will find your custom icon in the menu bar
Read more ...
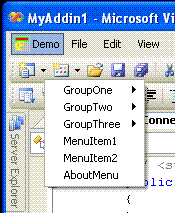
The following example demonstrates how to write a plug-in, clicking on which pops up a context menus with menu items as show in the figure
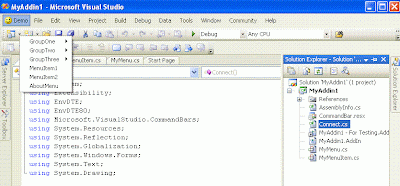
Follow the steps mentioned in the post to write a simple plugin 'Demo'. Create a new file 'MyMenuItem.cs' with the following content.
using System;
using System.Collections.Generic;
using System.Text;
using System.Windows.Forms;

namespace MyAddin1
{
internal class MyMenuItem : MenuItem
{
    public MyMenuItem(String name)
        : this(name, name, null, 0)
    {
    }

    public MyMenuItem(String name, String text, EventHandler eh, int id)
        : base(text, eh)
    {
        m_name = name;
        m_id = id;
    }

    public String MenuName
    {
        get { return m_name; }
        set { m_name = value; }
    }

    public int MyMenuID
    {
        get{ return m_id; }
    }

    private String m_name;
    private int m_id;
}
}
Add another file 'MyMenu.cs'
using System;
using System.Collections.Generic;
using System.Text;

using System.Windows.Forms;
using System.Collections;

namespace MyAddin1
{
internal class MyMenu : ContextMenu
{
    public MyMenu()
    {
        m_stackMenu = new Stack();
        m_stackMenu.Push(MenuItems);
    }

    public Menu.MenuItemCollection CurrentMenu
    {
        get { return (Menu.MenuItemCollection)m_stackMenu.Peek(); }
    }

    public void Add(String name, String text, int id)
    {
        CurrentMenu.Add(new MyMenuItem(name, text, m_eh, id));
    }

    public void PopAll()
    {
        m_stackMenu.Clear();
        m_stackMenu.Push(MenuItems);
    }

    public void PopMenu()
    {
        m_stackMenu.Pop();
    }

    public MyMenuItem PushMenu(String name, EventHandler eh)
    {
        m_menuitem = new MyMenuItem(name, name, eh, 0);
        CurrentMenu.Add(m_menuitem);
        m_stackMenu.Push(m_menuitem.MenuItems);
        return m_menuitem;
    }

    public EventHandler EventHandler
    {
        get { return m_eh; }
        set { m_eh = value; }
    }

    private Stack m_stackMenu;
    private EventHandler m_eh;
    private MyMenuItem m_menuitem;
}
}
Modify the OnConnection method in the file Connect.cs to make the add-in visible in the 'MenuBar' at the position 1
public void OnConnection(object application, ext_ConnectMode connectMode,
       object addInInst, ref Array custom)
{
   _applicationObject = (DTE2)application;
   _addInInstance = (AddIn)addInInst;
   if(connectMode == ext_ConnectMode.ext_cm_UISetup)
   {
       object[] contextGUIDS = new object[] { };
       Commands2 commands = (Commands2)_applicationObject.Commands;
       CommandBar bar = ((CommandBars)_applicationObject.CommandBars)["MenuBar"];

       try

       {
           Command command = commands.AddNamedCommand2(
                   _addInInstance, "MyAddin1", "Demo", "Do Something", true, 59,
                   ref contextGUIDS, (int)vsCommandStatus.vsCommandStatusSupported +
                   (int)vsCommandStatus.vsCommandStatusEnabled,
                   (int)vsCommandStyle.vsCommandStylePictAndText,
                   vsCommandControlType.vsCommandControlTypeButton);

           //Add a control for the command to the tools menu:

           if(command != null)
           {
               command.AddControl(bar, 1);
           }
       }
       catch(System.ArgumentException){
       }
   }
}
Modify Exec() method which executes whenever the command is invoked
public void Exec(string commandName, vsCommandExecOption executeOption,
       ref object varIn, ref object varOut, ref bool handled)
{
   handled = false;
   if(executeOption == vsCommandExecOption.vsCommandExecOptionDoDefault)
   {
       if(commandName == "MyAddin1.Connect.MyAddin1")
       {
           ShowMenu();
           handled = true;
           return;
       }
   }
}
The ShowMenu() lists the down how the context menu structure should look like
private void ShowMenu()
{
   Point pt;

   try
   {
       CommandBar bar = ((CommandBars)_applicationObject.CommandBars)["Demo"];
       CommandBarControl control = bar.Controls[1];
       pt = new Point(control.Left, control.Top);
   }
   catch(Exception){
       pt = Control.MousePosition;
   }

   Control window = new Control();
   window.CreateControl();

   MyMenu menu = new MyMenu();
   // Register event handler with MyMenu

   menu.EventHandler = new EventHandler(this.OnClick);

   menu.PushMenu("GroupOne", menu.EventHandler);
   menu.PushMenu("GroupOneMenu", menu.EventHandler);
   menu.PopMenu();
   menu.PopMenu();

   menu.PushMenu("GroupTwo", menu.EventHandler);
   menu.PushMenu("GroupTwoMenu", menu.EventHandler);
   menu.PopMenu();
   menu.PopMenu();

   menu.PushMenu("GroupThree", menu.EventHandler);
   menu.PushMenu("GroupThreeMenu1", menu.EventHandler);
   menu.PushMenu("GroupThreeMenu2", menu.EventHandler);
   menu.PushMenu("GroupThreeMenu3", menu.EventHandler);
   menu.PopAll(); // either call PopMenu() 4 times or PopAll()

   menu.Add("MenuItem1", "MenuItem1", -1);
   menu.Add("MenuItem2", "MenuItem2", -2);
   menu.Add("AboutDemo", "AboutMenu", -3);

   menu.Show(window, pt); //displays context menu

}
Handling Click events on MenuItems
private void OnClick(Object sender, EventArgs e)
{
   try
   {
       MyMenuItem mi = (MyMenuItem)sender;
       MessageBox.Show("Hello from " + mi.MenuName);
   }
   catch(Exception ex){
       MessageBox.Show(ex.Message, ex.Source);
   }
}
Now select the Menu Item from the GroupThree

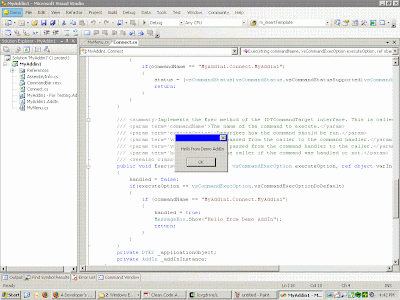
You see a message box with the message 'Hello from GroupThreeMenu3'
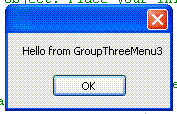
Your plugin is working as expected. Cheers !! :)
Read more ...
An add-in is an extension which integrates with the Visual Studio environment and provides new functionality to it. An add-in has full access to Visual Studio (IDE) tools and APIs and can interact with them. An add-in is a compiled DLL file which can be loaded by Visual Studio when it starts.
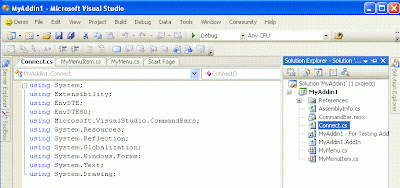
Creating a Sample Add-In
1. Create a New → Project
2. Select Other Project Types → Extensibility → Visual Studio Add-in
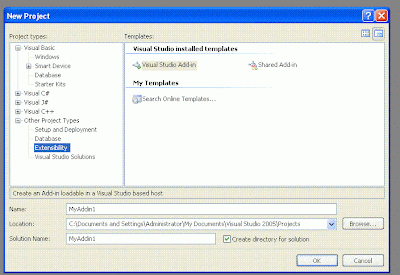
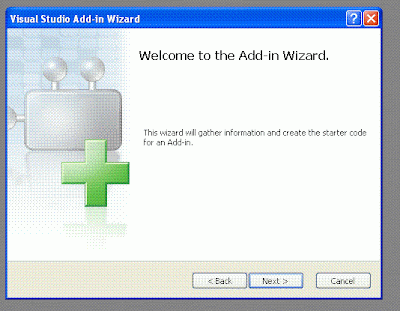
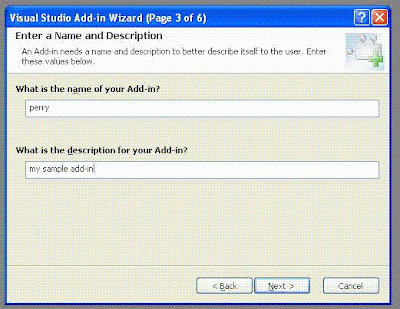
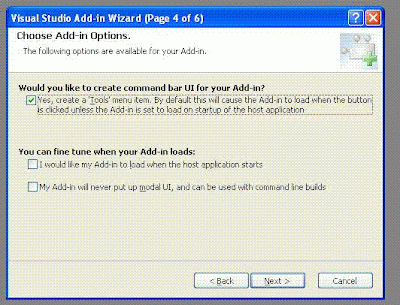
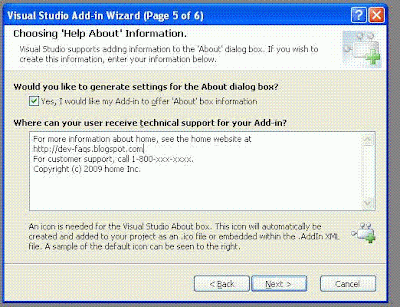
3. An Add-In wizard pops up which will guide you through a series of 7 steps including the welcome page to configure your add-in
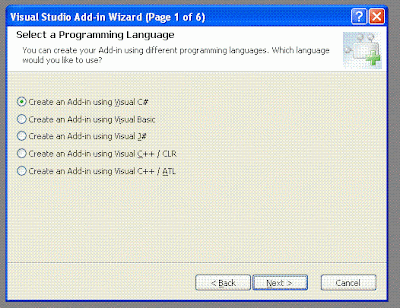
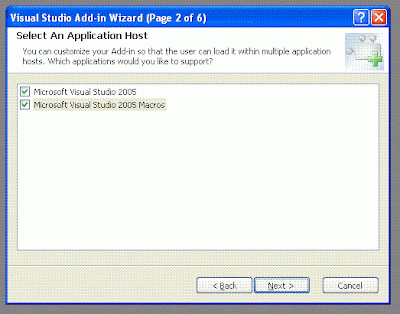
Select for creating a 'Tools' menu item. This will list the add-in in tools menu items
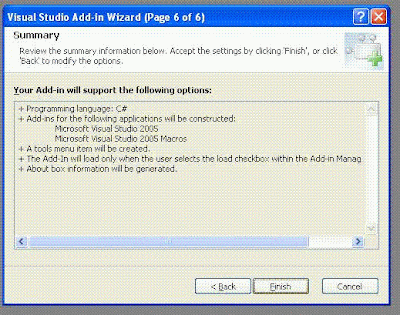
On clicking finish, three main files are generated for you
a) CommandBar.resx (Resource File)
b) Connect.cs (Main class file for Add-In logic)
c) WizardSample.AddIn (XML Configuration file for your add-in)
Build the solution and run the project. You will see a Visual Studio instance running within the visual studio. Click on 'Tools' and you can find your Add-In there.
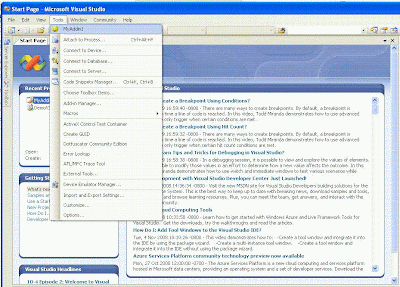
Modify the function OnConnection() as below to add the plugin to 'MenuBar'
public void OnConnection(object application, ext_ConnectMode connectMode,
        object addInInst, ref Array custom)
{

    _applicationObject = (DTE2)application;
    _addInInstance = (AddIn)addInInst;
    if(connectMode == ext_ConnectMode.ext_cm_UISetup)
    {
        object []contextGUIDS = new object[] { };
        Commands2 commands = (Commands2)_applicationObject.Commands;
        CommandBar bar = ((CommandBars)_applicationObject.CommandBars)["MenuBar"];

        try{
            Command command = commands.AddNamedCommand2(
                    _addInInstance, "MyAddin1", "Demo", "Do Something", true, 59,
                    ref contextGUIDS,(int)vsCommandStatus.vsCommandStatusSupported+
                    (int)vsCommandStatus.vsCommandStatusEnabled,
                    (int)vsCommandStyle.vsCommandStylePictAndText,
                    vsCommandControlType.vsCommandControlTypeButton);

            //Add a control for the command to the tools menu:

            if(command != null) {
                command.AddControl(bar, 1);
            }
        }
        catch(System.ArgumentException){
        }
    }
}

Modify Exec() function to add some functionality to the plugin
public void Exec(string commandName, vsCommandExecOption executeOption,
        ref object varIn, ref object varOut, ref bool handled)
{
    handled = false;
    if(executeOption == vsCommandExecOption.vsCommandExecOptionDoDefault)
    {
        if(commandName == "MyAddin1.Connect.MyAddin1")
        {
            handled = true;
            MessageBox.Show("Hello from Demo AddIn");

            return;
        }
    }
}
Read more ...

Life is gift wrapped with beautiful cover. Most of the time we are stuck with the wrapper and forget to open the gift. We should open the cover and enjoy the gift.
A group of alumni, highly established in their careers got together to visit old university professor. Conversation soon turned into complaints about stress in work and life.
Offering his guest coffee, professor went to the kitchen and brought a large pot of coffee and assortment of cups- porcelain, plastic, glass, crystal. Some plain looking, some expensive and some exquisite, telling them to help themselves to hot coffee.
When all the student had a cup of coffee in hand professor said-
If you noticed, all the nice looking expensive cups were taken up leaving behind the plain and cheap ones. It is normal for you to want only the best for yourself But that is the source of your problem and stress.
What all of you wanted was coffee, not the cup, but you consciously want for the best cup and were eyeing each other's cup.
Now if life is coffee, than jobs, money and position in society are the cups. They are just tools to hold Life, but the quality of Life doesn’t change. Sometimes by concentrating only on the cup we fail to enjoy the coffee in it.
So don’t let the cups drive you….
Enjoy the coffee instead.
Read more ...
A lecturer, when explaining stress management to an audience, raised a glass of water and asked, "How heavy is this glass of water?"
Answers called out ranged from 8 ounces to 20 ounces.
The lecturer replied, "The absolute weight doesn’t matter. It depends on how long you try to hold it. If I hold it for a minute, that’s not a problem. If I hold it for an hour, I’ll have an ache in my right arm. If I hold it for a day, you’ll have to call an ambulance.
In each case, it’s the same weight, but the longer I hold it, the heavier it becomes". He continued, "And that’s the way it is with stress management. If we carry our burdens all the time, sooner or later, as the burden becomes increasingly heavy, we won’t be able to carry on.
As with the glass of water, you have to put it down for a while and rest before holding it again. When we’re refreshed, we can carry on with the burden.
So, before you return home tonight, put the burden of work down. Don’t carry it home. You can pick it up tomorrow. Whatever burdens you’re carrying now, let them down for a moment if you can.
Relax, pick them up later after you’ve rested. Life is short. Enjoy it!
Read more ...
|
|


