|
|
There are basically two ways of traversing a binary tree
1. Depth First Traversals
2. Breadth First Traversal
Depth First Traversal
A binary tree can be traversed in three ways using the depth first approach namely
1. Inorder Traversal
template <typename T>
  void BTTraveller<T>::inOrder(BSTNode<T> *node, std::deque<T> &out)
  {
    if(node)
    {
      inOrder(node->left, out);
      out.push_back(node->key);
      inOrder(node->right, out);
    }
  }
2. Preorder Traversal
template <typename T>
  void BTTraveller<T>::preOrder(BSTNode<T> *node, std::deque<T> &out)
  {
    if(node)
    {
      out.push_back(node->key);
      preOrder(node->left, out);
      preOrder(node->right, out);
    }
  }
3. Postorder Traversal
template <typename T>
  void BTTraveller<T>::postOrder(BSTNode<T> *node, std::deque<T> &out)
  {
    if(node)
    {
      postOrder(node->left, out);
      postOrder(node->right, out);
      out.push_back(node->key);
    }
  }
Breadth First Traversal
There is only one kind of Breadth first traversal viz. Level Order traversal. This traversal does not move along the branches of the tree but makes use of a FIFO queue. In the sample code, I have used std::deque as the helper queue for achieving the same.
template <typename T>
  void BTTraveller<T>::levelOrder(BST<T> *bstree, std::deque<T> &out)
  {
    std::deque<BSTNode<T>*> hQ;
    hQ.push_back(bstree->m_root);
    levelOrder(hQ, out);
  }

  template <typename T>
  void BTTraveller<T>::levelOrder(std::deque<BSTNode<T>*> &hQ, std::deque<T> &out)
  {
    while(hQ.empty() == false)
    {
      BSTNode<T> *current = hQ.front();
      if(current != NULL)
      {
        hQ.pop_front();
        out.push_back(current->key);
        addChildren(current, hQ);
      }
    }
  }
The BTTraveller class takes care of returning Binary Tree node elements in the order you are traversing the tree.
1 #ifndef _BTTraveller_H_
2 #define _BTTraveller_H_
3 #include "BSTNode.h"
4 #include <deque>
5
6
7 namespace algorithms
8 {
9 template <typename T>
10 class BTTraveller
11 {
12 public:
13 static void inOrder(BST<T> *bstree, std::deque<T> &elems);
14 static void preOrder(BST<T> *bstree, std::deque<T> &elems);
15 static void postOrder(BST<T> *bstree, std::deque<T> &elems);
16 static void levelOrder(BST<T> *bstree, std::deque<T> &elems);
17
18 private:
19 static void inOrder(BSTNode<T> *node, std::deque<T> &elems);
20 static void preOrder(BSTNode<T> *node, std::deque<T> &elems);
21 static void postOrder(BSTNode<T> *node, std::deque<T> &elems);
22 static void levelOrder(std::deque<BSTNode<T>*> &helperQ, std::deque<T> &elems);
23 static void addChildren(BSTNode<T> *node, std::deque<BSTNode<T>*> &helperQ);
24
25 BTTraveller();
26 BTTraveller(const BTTraveller&);
27 const BTTraveller& operator=(const BTTraveller&);
28 };
29 };
30
31 #include "BTTraveller.hpp"
32 #endif
1
2 namespace algorithms
3 {
4 template <typename T>
5 void BTTraveller<T>::inOrder(BST<T> *bstree, std::deque<T> &out)
6 {
7 inOrder(bstree->m_root, out);
8 }
9
10 template <typename T>
11 void BTTraveller<T>::preOrder(BST<T> *bstree, std::deque<T> &out)
12 {
13 preOrder(bstree->m_root, out);
14 }
15
16 template <typename T>
17 void BTTraveller<T>::postOrder(BST<T> *bstree, std::deque<T> &out)
18 {
19 postOrder(bstree->m_root, out);
20 }
21
22 template <typename T>
23 void BTTraveller<T>::levelOrder(BST<T> *bstree, std::deque<T> &out)
24 {
25 std::deque<BSTNode<T>*> hQ;
26 hQ.push_back(bstree->m_root);
27 levelOrder(hQ, out);
28 }
29
30 template <typename T>
31 void BTTraveller<T>::inOrder(BSTNode<T> *node, std::deque<T> &out)
32 {
33 if(node)
34 {
35 inOrder(node->left, out);
36 out.push_back(node->key);
37 inOrder(node->right, out);
38 }
39 }
40
41 template <typename T>
42 void BTTraveller<T>::preOrder(BSTNode<T> *node, std::deque<T> &out)
43 {
44 if(node)
45 {
46 out.push_back(node->key);
47 preOrder(node->left, out);
48 preOrder(node->right, out);
49 }
50 }
51
52 template <typename T>
53 void BTTraveller<T>::postOrder(BSTNode<T> *node, std::deque<T> &out)
54 {
55 if(node)
56 {
57 postOrder(node->left, out);
58 postOrder(node->right, out);
59 out.push_back(node->key);
60 }
61 }
62
63 template <typename T>
64 void BTTraveller<T>::levelOrder(std::deque<BSTNode<T>*> &hQ, std::deque<T> &out)
65 {
66 while(hQ.empty() == false)
67 {
68 BSTNode<T> *current = hQ.front();
69 if(current != NULL)
70 {
71 hQ.pop_front();
72 out.push_back(current->key);
73 addChildren(current, hQ);
74 }
75 }
76 }
77
78 template <typename T>
79 void BTTraveller<T>::addChildren(BSTNode<T> *node, std::deque<BSTNode<T>*> &hQ)
80 {
81 if(node->left != NULL)
82 {
83 hQ.push_back(node->left);
84 }
85 if(node->right != NULL)
86 {
87 hQ.push_back(node->right);
88 }
89 }
90 }
You need to include BTTraveller class as a friend class in both the BSTNode as well as BST class declarations. This ensures that the BTTraveller class has access to private data members of these two classes
The BSTNode class
1 #ifndef _BSTNode_H_
2 #define _BSTNode_H_
3 #include <iostream>
4
5
6 namespace algorithms
7 {
8 template <typename T>
9 class BST;
10
11 template <typename T>
12 class BTTraveller;
13
14 template <typename T>
15 class BSTNode
16 {
17 public:
18 BSTNode(T key);
19 ~BSTNode();
20
21 friend class BST<T>;
22 friend class BTTraveller<T>;
23
24 private:
25 BSTNode<T> *left;
26 BSTNode<T> *right;
27 T key;
28 };
29 };
30
31 #include "BSTNode.hpp"
32 #endif
The BST class
1 #ifndef _BinarySearchTree_H_
2 #define _BinarySearchTree_H_
3 #include "BSTNode.h"
4
5
6 namespace algorithms
7 {
8 template <typename T>
9 class BTTraveller;
10
11 template <typename T>
12 class BST
13 {
14 public:
15 BST();
16 ~BST();
17
18
19 void insert(T key);
20 void remove(T key);
21 void clear();
22
23
24 bool find(T key);
25 bool isEmpty() const;
26
27 friend class BTTraveller<T>;
28
29 private:
30 void remove(BSTNode<T> **node);
31 void clear(BSTNode<T> *node);
32 BSTNode<T>** find(BSTNode<T> **node, const T key);
33 BSTNode<T>** getSuccessor(BSTNode<T> **node);
34 BSTNode<T>* getNewNode(T key);
35
36
37 BSTNode<T> *m_root;
38 };
39 };
40
41 #include "BST.hpp"
42 #endif
The BSTNode.hpp and BST.hpp files remains the same as in the post
The Client Program
1 #include "BST.h"
2 #include "BTTraveller.h"
3 #define MAX 20
4 using namespace algorithms;
5
6
7
8 template <typename T>
9 void DumpDeque(std::deque<T> &q)
10 {
11 std::cout << std::endl;
12 std::deque<T>::const_iterator itr;
13 for(itr = q.cbegin(); itr != q.cend(); ++itr)
14 {
15 std::cout << *itr << " ";
16 }
17 std::cout << std::endl;
18 q.clear();
19 }
20
21 int main(int argc, char *argv[])
22 {
23 int nodes[MAX] = { 50, 40, 60, 70, 80, 20, 30, 10, 90, 15, 35, 65, 75, 5, 1, 100, 110, 130, 120, 111 };
24 BST<int> bstInt;
25 for(int i = 0; i < MAX; ++i)
26 {
27 bstInt.insert(nodes[i]);
28 }
29
30 std::deque<int> elems;
31 BTTraveller<int>::inOrder(&bstInt, elems);
32 DumpDeque(elems);
33 BTTraveller<int>::preOrder(&bstInt, elems);
34 DumpDeque(elems);
35 BTTraveller<int>::postOrder(&bstInt, elems);
36 DumpDeque(elems);
37 BTTraveller<int>::levelOrder(&bstInt, elems);
38 DumpDeque(elems);
39
40 return 0;
41 }
Output
$ ./BinarySearchTree.exe

1 5 10 15 20 30 35 40 50 60 65 70 75 80 90 100 110 111 120 130

50 40 20 10 5 1 15 30 35 60 70 65 80 75 90 100 110 130 120 111

1 5 15 10 35 30 20 40 65 75 111 120 130 110 100 90 80 70 60 50

50 40 60 20 70 10 30 65 80 5 15 35 75 90 1 100 110 130 120 111
Read more ...
A Binary Tree is a tree where each node may have 0, 1 or 2 children and a Binary Search Tree is a binary tree with a special property that the value of node under discussion is less than all the nodes in its right subtree and greater than all the nodes in its left subtree.
The programs below describes the three basic operations in a binary search tree viz. search, insert and remove
1. Searching a node
  template <typename T>
  BSTNode<T>** BST<T>::find(BSTNode<T> **node, const T key)
  {
    if(*node == NULL || (*node)->key == key)
    {
      return node;
    }
    else if((*node)->key > key)
    {
      return find(&(*node)->left, key);
    }
    else
    {
      return find(&(*node)->right, key);
    }
  }
2. Inserting a node
template <typename T>
  void BST<T>::insert(T key)
  {
    BSTNode<T> **node = find(&m_root, key);
    if(*node == NULL)
    {
      *node = getNewNode(key);
    }
  }
3. Removing a node
Removing a node from binary search tree is the trickiest of all the operations. There are three cases to be considered when removing a node from a binary search tree:
Case 1. If both left and right child are null, the node can simply be deleted.
Case 2. If only one of the right child or left child is null, the address of the node is set to point to the left child or the right child which ever is not null and the current node is deleted.
Case 3. The complex of the three cases, if both left and right child are present. This requires finding the successor of the current node which is to be removed.
template <typename T>
  void BST<T>::remove(BSTNode<T> **node)
  {
    BSTNode<T> *old = *node;
    if((*node)->left == NULL)
    {
      *node = (*node)->right;
      delete old;
    }
    else if((*node)->right == NULL)
    {
      *node = (*node)->left;
      delete old;
    }
    else
    {
      BSTNode<T> **successor = getSuccessor(node);
      (*node)->key = (*successor)->key;
      remove(successor);
    }
  }
Following is the complete example showing the implementation details of the search, find and remove operations in a binary search tree.
The BST Node Class
1 #ifndef _BSTNode_H_
2 #define _BSTNode_H_
3 #include <iostream>
4
5
6 namespace algorithms
7 {
8 template <typename T>
9 class BST;
10
11 template <typename T>
12 class BSTNode
13 {
14 public:
15 BSTNode(T key);
16 ~BSTNode();
17
18 friend class BST<T>;
19
20 private:
21 BSTNode<T> *left;
22 BSTNode<T> *right;
23 T key;
24 };
25 };
26
27 #include "BSTNode.hpp"
28 #endif
1
2 namespace algorithms
3 {
4 template <typename T>
5 BSTNode<T>::BSTNode(T key) : left(0), right(0)
6 {
7 this->key = key;
8 }
9
10 template <typename T>
11 BSTNode<T>::~BSTNode()
12 {
13 }
14 }
15
The Binary Search Tree Class
1 #ifndef _BinarySearchTree_H_
2 #define _BinarySearchTree_H_
3 #include "BSTNode.h"
4
5
6 namespace algorithms
7 {
8 template <typename T>
9 class BST
10 {
11 public:
12 BST();
13 ~BST();
14
15
16 void insert(T key);
17 void remove(T key);
18 void clear();
19
20
21 bool find(T key);
22 bool isEmpty() const;
23
24 private:
25 void remove(BSTNode<T> **node);
26 void clear(BSTNode<T> *node);
27 BSTNode<T>** find(BSTNode<T> **node, const T key);
28 BSTNode<T>** getSuccessor(BSTNode<T> **node);
29 BSTNode<T>* getNewNode(T key);
30
31
32 BSTNode<T> *m_root;
33 };
34 };
35
36 #include "BST.hpp"
37 #endif
1
2 namespace algorithms
3 {
4 template <typename T>
5 BST<T>::BST()
6 {
7 m_root = 0;
8 }
9
10 template <typename T>
11 BST<T>::~BST()
12 {
13 clear();
14 }
15
16 template <typename T>
17 void BST<T>::clear()
18 {
19 clear(m_root);
20 }
21
22 template <typename T>
23 void BST<T>::clear(BSTNode<T> *node)
24 {
25 if(node != NULL)
26 {
27 clear(node->left);
28 clear(node->right);
29 delete node;
30 }
31 }
32
33 template <typename T>
34 void BST<T>::insert(T key)
35 {
36 BSTNode<T> **node = find(&m_root, key);
37 if(*node == NULL)
38 {
39 *node = getNewNode(key);
40 }
41 }
42
43 template <typename T>
44 void BST<T>::remove(T key)
45 {
46 BSTNode<T> **node = find(&m_root, key);
47 remove(node);
48 }
49
50 template <typename T>
51 void BST<T>::remove(BSTNode<T> **node)
52 {
53 BSTNode<T> *old = *node;
54 if((*node)->left == NULL)
55 {
56 *node = (*node)->right;
57 delete old;
58 }
59 else if((*node)->right == NULL)
60 {
61 *node = (*node)->left;
62 delete old;
63 }
64 else
65 {
66 BSTNode<T> **successor = getSuccessor(node);
67 (*node)->key = (*successor)->key;
68 remove(successor);
69 }
70 }
71
72 template <typename T>
73 BSTNode<T>** BST<T>::getSuccessor(BSTNode<T> **node)
74 {
75 BSTNode<T> **tmp = &(*node)->left;
76 while((*tmp)->right != NULL)
77 {
78 tmp = &(*tmp)->right;
79 }
80 return tmp;
81 }
82
83 template <typename T>
84 bool BST<T>::find(const T key)
85 {
86 BSTNode<T> **pos = find(&m_root, key);
87 return *pos != NULL;
88 }
89
90 template <typename T>
91 bool BST<T>::isEmpty() const
92 {
93 return m_root == 0;
94 }
95
96 template <typename T>
97 BSTNode<T>** BST<T>::find(BSTNode<T> **node, const T key)
98 {
99 if(*node == NULL || (*node)->key == key)
100 {
101 return node;
102 }
103 else if((*node)->key > key)
104 {
105 return find(&(*node)->left, key);
106 }
107 else
108 {
109 return find(&(*node)->right, key);
110 }
111 }
112
113 template <typename T>
114 BSTNode<T>* BST<T>::getNewNode(T key)
115 {
116 BSTNode<T> *node = new BSTNode<T>(key);
117 if(node == NULL)
118 {
119 std::cerr << "ERROR: Insufficient Memory";
120 std::cerr << std::endl;
121 }
122 return node;
123 }
124 }
The Client Program for testing the BST code above
1 #include "BST.h"
2 #define MAX 20
3 using namespace algorithms;
4
5
6 int main(int argc, char *argv[])
7 {
8 int nodes[MAX] = { 50, 40, 60, 70, 80, 20, 30, 10, 90, 15, 35, 65, 75, 5, 1, 100, 110, 130, 120 };
9 BST<int> bstInt;
10 for(int i = 0; i < MAX; ++i)
11 {
12 bstInt.insert(nodes[i]);
13 }
14
15 std::cout << (bstInt.find(130) ? "true" : "false");
16 bstInt.remove(50);
17 std::cout << (bstInt.find(50) ? "true" : "false");
18
19 return 0;
20 }
Output of the run
$ ./BinarySearchTree.exe
truefalse
Read more ...
Static library is a group of object files bundled together in an archive by the archiver program. The static libraries have a .a extension.
Advantages
1. The executable is not dependent on any library as the library code is included in the binary
2. In some cases performance improvement Command for creating a static library
ar rcs -o libmylibrary.a file1.o file2.o file3.o
Steps for generating the static library libemployee.a for the Employee Program written in the previous post
1. Compiling source files to object files
g++ -Wall -c -fPIC -O -I. -o Employee.o Employee.cpp 2. Command for building the archive file libemployee.a
ar -rcs -o libemployee.a Employee.o
Read more ...
A shared library is a library required by an executable to run properly. Such executables are called incomplete executables as they call routines present in the shared library code. The executables generated from the shared library are smaller in size than the ones generated from a static library
When an executable built with shared library is run, the dynamic loader identifies the list of dependent libraries to be loaded and searches for them in the standard default locations and the locations pointed to by the environment variable LD_LIBRARY_PATH (Linux), SHLIB_PATH (HP-UX), LIBPATH (AIX)
Shown below is the Employee class which we will use to generate the shared library libemployee.so
1 #ifndef _Employee_H_
2 #define _Employee_H_
3
4
5
6 #include <iostream>
7
8 class Employee
9 {
10 public:
11 Employee();
12 Employee(const std::string name, int age);
13 virtual ~Employee();
14
15
16 void setName(const std::string name);
17 void setAge(int age);
18
19
20 const char* getName() const;
21 int getAge() const;
22
23 private:
24 std::string m_name;
25 int m_age;
26 };
27
28 #endif
1 #include "Employee.h"
2
3
4 Employee::Employee()
5 {
6 }
7
8 Employee::Employee(const std::string name, int age)
9 {
10 m_name = name;
11 m_age = age;
12 }
13
14 Employee::~Employee()
15 {
16 }
17
18 void Employee::setName(const std::string name)
19 {
20 m_name = name;
21 }
22
23 void Employee::setAge(int age)
24 {
25 m_age = age;
26 }
27
28 const char* Employee::getName() const
29 {
30 return m_name.c_str();
31 }
32
33 int Employee::getAge() const
34 {
35 return m_age;
36 }
Compiling the Employee source files to object files g++ -Wall -c -fPIC -O -I. -o Employee.o Employee.cpp
Linking the object files to generate the shared library libemployee.so gcc -o libemployee.so Employee.o -shared -fPIC -Wl,-rpath,. -L. -lstdc++
Read more ...
In our earlier post, we have written multithreaded program using win32 apis. This post deals with writing the multithreaded programs using POSIX thread apis. The important POSIX thread apis are namely pthread_create, pthread_exit and pthread_join
Create a thread int pthread_create
(
pthread_t *thread,
const pthread_attr_t *attr,
void *( *start_routine)(void *),
void *arg
);
Terminate a thread
void pthread_exit (void *retval);
Wait on a thread
int pthread_join (pthread_t thread, void **status);
The Complete Example
#include <pthread.h>
#include <iostream>

//File: SimpleThreadExample.cpp

#define MAX_THREADS 3
using namespace std;

void* func(void *args)
{
    int tp = *(int *)args * 10;
    while(tp--)
    {
        cout << *(int *) args;
        fflush(stdout);
        sleep(1);
    }

    cout << endl;
    pthread_exit((void *)10);
    return (void *)10;
}

int main(void)
{
    pthread_t tid[MAX_THREADS] = {0};
    int param[MAX_THREADS] = { 1, 2, 3 };

    int rc;
    for(int i = 0; i < MAX_THREADS; ++i)
    {
        rc = pthread_create(&tid[i], NULL, func, ¶m[i]);
        if(0 != rc)
        {
            cout << "ERROR: Thread Creation failed" << endl;
        }
        cout << "Thread[" << tid[i] << "] Created" << endl;
    }

    void *status[3];
    for(int i = 0; i < MAX_THREADS; ++i)
    {
        rc = pthread_join(tid[i], &status[i]);
    }

    for(int i = 0; i < MAX_THREADS; ++i)
    {
        cout << "Thread[" << tid[i] << "] returned with exit code=" << (long) status[i] << endl;
    }

    cout << "Main thread terminating" << endl;
    return 0;
}
The makefile for the project
#-----------------------------------------------------------------------
#                   A simple thread example
#-----------------------------------------------------------------------
PROJECT := SimpleThreadExample

SRCEXT := .h .cpp
OBJEXT := .o
EXEEXT := .exe

#compilers
CC := gcc
CXX := g++

#flags
CFLAGS := -o
CXXFLAGS := -o
LDFLAGS := -lpthread -o

#disable implicit suffix rules
.SUFFIXES:
.SUFFIXES: $(SRCEXT) $(OBJEXT) $(EXEEXT)

SRC := \
    SimpleThreadExample.cpp

OBJ := \
    $(SRC:.cpp=.o)

EXE := \
    $(PROJECT)$(EXEEXT)

#define dummy targets
.PHONY: all clean compile link

all : compile link

clean :
    @echo

    @echo "Cleaning Temporary Files..."
    $(RM) $(OBJ) $(EXE)

compile : $(OBJ)

link : $(EXE)

$(OBJ) :
    @echo
    @echo "Compiling Source Files..."
    $(CXX) $(CXXFLAGS) $(OBJ) $(SRC)

$(EXE) :
    @echo
    @echo "Linking..."
    $(LD) $(OBJ) $(LDFLAGS) $(EXE)

run :
    @echo
    @$(EXE)
Building the project. (The output is from Cygwin Environment. You may need to modify the makefile to compile it on a linux environment)
$ gmake clean all

Cleaning Temporary Files...
rm -f SimpleThreadExample.o SimpleThreadExample.exe

Compiling Source Files...
g++ -o SimpleThreadExample.o SimpleThreadExample.cpp

Linking...
ld SimpleThreadExample.o -lpthread -o SimpleThreadExample.exe
Output:
Read more ...
Working on multiple projects which require different compiler versions can be a daunting task especially if you are using windows command prompt cmd.exe to build the projects. You need to export the compiler specific environment variables and set the PATH variable appropriately each time you launch the command window to build each project. Here is a small tip that can help save some time
Tip
Write a batch file which will set the necessary environment variables and the path variable before launching the command window
A simple batch script which sets JAVA_HOME to jdk1.6.0_21 and launches the command prompt window
set JAVA_HOME=
set JAVA_HOME=c:\Program Files\Java\jdk1.6.0_21

set PATH=%JAVA_HOME%\bin;%PATH%
start cmd /k
On executing the batch file, command prompt window is launched with the JAVA_HOME environment variable set to the desired version (jdk1.6.0_21)

Read more ...
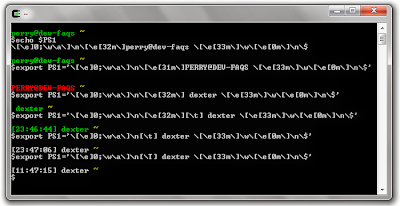
From the bash manual, the following environment variables control the display of prompt in a Cygwin or Linux terminal namely PS1, PS2, PS3, PS4.
Note: For referring the bash manual type info bash
Key Points
1. PS1 : The value of this parameter is expanded and used as the primary prompt string. It's default value is '\s-\v\$ '
2. PS2 : The value of this parameter is expanded as with PS1 and used as the secondary prompt string. The default value is >
3. PS3 : The value of this variable is used as the prompt for select command. If this variable is not set, select command prompts with #?
4. PS4 : The prompt is used when you have tracing enabled for debugging the bash scripts. The PS4 value is printed each time the command is echoed on the screen. The default value is +
a) PS1 demo
1. Identify the current prompt setting in your Cygwin/Linux terminal by typing echo $PS1
2. Make the modifications to PS1 and export the new PS1 variable. Your prompt should change immediately
 b) PS2 demo
When executing interactively, bash displays the primary prompt PS1 when it is ready to read a command, and the secondary prompt PS2 when
it needs more input to complete a command.

c) PS3 demo
This prompts user to provide an input.
LINUX=linux
WIN32=win32
HPUX=hpux
SUNOS=sunos
AIX=aix
QUIT=quit
OPTIONS="\
$LINUX \
$WIN32 \
$HPUX \
$SUNOS \
$AIX \
$QUIT"
select option in $OPTIONS;
do
echo "${option}"
if [ "${option}" = "quit" ]; then
exit
fi
done
Output:

d) PS4 demo
Enable tracing by typing the following command set -x

Bash allows these prompt strings to be customized by inserting a number of backslash-escaped special characters that are decoded as follows:
\a     an ASCII bell character (07)
\d     the date in "Weekday Month Date" format (e.g., "Tue May 26")
\D{format}
    the format is passed to strftime(3) and the result is inserted into the prompt  string;  an  empty  format  results  in  a locale-specific time representation.  The braces are required
\e     an ASCII escape character (033)
\h     the hostname up to the first `.'
\H     the hostname
\j     the number of jobs currently managed by the shell
\l     the basename of the shell's terminal device name
\n     newline
\r     carriage return
\s     the name of the shell, the basename of $0 (the portion following the final slash)
\t     the current time in 24-hour HH:MM:SS format
\T     the current time in 12-hour HH:MM:SS format
\@     the current time in 12-hour am/pm format
\A     the current time in 24-hour HH:MM format
\u     the username of the current user
\v     the version of bash (e.g., 2.00)
\V     the release of bash, version + patch level (e.g., 2.00.0)
\w     the current working directory, with $HOME abbreviated with a tilde
\W     the basename of the current working directory, with $HOME abbreviated with a tilde
\!     the history number of this command
\#     the command number of this command
\$     if the effective UID is 0, a #, otherwise a $
\nnn   the character corresponding to the octal number nnn
\\     a backslash
\[     begin a sequence of non-printing characters, which could be used to embed a terminal control sequence into the prompt
\]     end a sequence of non-printing characters
References:
1. bash manual
Read more ...
A process is a program in execution. A process may have one or more threads executing different sections of the program. Every thread in the process maintains it's own separate stack, registers and program counter.
Key Points
A stack is a collection of stack frames where each stack frame refers to a function call
Stack Frame
When a function call is made, a block of memory is set aside which stores information about the following:
1. Arguments passed to the function
2. Return address of the caller function
3. Local variables used by the function and
4. Other temporary variables needed by the compiler
This block of memory is called a stack frame. When the function returns, the stack frame is turned invalid and reclaimed.
Registers used in a Stack Frame
1. ESP (Extended Stack Pointer) : 32 bit register that points to the top of the stack. All the addresses lower than the stack pointer are considered unused or garbage and all the higher addresses are considered valid
2. EBP (Extended Base Pointer) : Also known as Frame Pointer, this 32 bit register is used to reference all the function parameters and the local variables in the current stack frame
ebp + 4 + 4 * n points to the address at which the nth argument of the function is stored
ebp + 4 points to the address at which return address of the caller function is stored
ebp is the frame pointer of the callee function
ebp - 4n refers to the address where the nth local variable is stored
3. EIP (Extended Instruction Pointer) : This register holds the address of the next instruction to be executed. It is saved on to the stack as part of the CALL instruction. Also known as Program Counter
4. EAX, EBX, ECX, EDX : General purpose registers for storing intermediate results
Following figure shows how stack frames are laid out in memory during execution

Read more ...
Continuing our series on makefile tutorial, below is a simple makefile which compiles the Hello World program Main.cpp into an object file Main.o and generates the binary executable Main.exe
PROJECT := Main
SRCEXT := .h .cpp
OBJEXT := .o
EXEEXT := .exe
CC := gcc
CXX := g++
CFLAGS := -o
CXXFLAGS := -o
LDFLAGS := -o
.SUFFIXES:
.SUFFIXES: $(SRCEXT) $(OBJEXT) $(EXEEXT)
SRC := \
Main.cpp
OBJ := \
$(SRC:.cpp=.o)
EXE := \
$(PROJECT)$(EXEEXT)
.PHONY: all clean compile link
all : compile link
clean :
@echo
@echo "Cleaning Temporary Files..."
$(RM) $(OBJ) $(EXE)
compile : $(OBJ)
link : $(EXE)
$(OBJ) :
@echo
@echo "Compiling Source Files..."
$(CXX) $(CXXFLAGS) $(OBJ) $(SRC)
$(EXE) :
@echo
@echo "Linking..."
$(LD) $(OBJ) $(LDFLAGS) $(EXE)
run :
@echo
@$(EXE)
The Hello World program
#include <iostream>

int main()
{
    printf("Hello World");
    return 0;
}
Output

Read more ...
The purpose of the make utility is to determine automatically which pieces of your large program needs to be re-compiled, and issue the commands to recompile them. The make program uses the makefile instructions and the last modified time of the files to decide which of the files needs to be updated.
A makefile tells make what to do. The make utility executes commands in the makefile to update one or more targets. If -f option is not provided, make looks for the makefiles GNUmakefile, makefile, and Makefile, in that order.
Key Points
1. Make is a software engineering tool which helps simplifies the process of software development
2. Makefiles can be used to automate the build process (Generation of binary from source files)
3. The programmer does not need to type the complex compiler commands and flags to be used during compilation
1. Variables
1. A variable in a makefile can be a recursively expanded variable NAME = value or a simply expanded variable NAME := value
2. The variable's value can be accessed using $(NAME) or ${NAME}
3. As a convention, the variable names are always written in uppercase.
4. Variable names are case-sensitive and should not contain other than letters, numbers and underscores as they may have a special meaning
5. Setting a variable if not already set use ?= e.g. NAME ?= value
Note: You cannot append a value at the end of the recursively expanded variable using CC = $(CC) -O2. This will end up in an infinite loop as make will continue expanding this variable until it cannot be expanded anymore. To overcome this problem, we use simply expanded variables to append values at the end as shown
CC := g++ -o
CC += $(CC) -O2
2. Explicit Rules
Explicit rules tell make which files depend on the compilation of other files and the commands required to compile those files. They take the following form:
targetfile : dependentfiles
[TAB]commands
...
[TAB]commands
3. Implicit Rules or Suffix Rules
Implicit rules are similar to explicit rules except that they are listed without commands. The make utility makes uses of the file suffixes to determine what commands to execute on the source files
hello.o : hello.c
Running make will cause the following command to be executed cc -c -o hello.o hello.c
Common variables used by implicit rules:
AR  : archive program, default ar
CC  : compiling c program, default cc
CXX : compiling c++ program, default g++
CPP : c preprocessor, default $(CC) -E
RM  : remove, default rm -f
Flags used by the programs above
ARFLAGS  : flags for the archive program, default rv
CFLAGS   : flags for the c compiler
CXXFLAGS : flags for the c++ compiler
CPPFLAGS : flags for the c preprocessor
LDFLAGS  : flags for the linker
Some of the old fashioned suffix rules for C and C++ are:
Compiling C Programs
file.o is automatically built from file.c. $(CC) -c $(CPPFLAGS) $(CFLAGS)

Compiling C++ Programs
file.o is automatically built from file.cc. $(CXX) -c $(CPPFLAGS) $(CXXFLAGS)

Linking Object Files
file is automatically generated from file.o by running the linker (ld). $(CC) $(LDFLAGS) file.o $(LOADLIBS) $(LDLIBS)
The default suffix list for common C and C++ programs include .out, .a, .o, .c, .cc, .C, .def, .h. The complete list can be found out here
The above catalogue of implicit rules are always available unless makefile explicitely overrides them. Running make with -r or --no-builtin-rules option cancels all predefined rules
Implicit rules can also be disabled by disabling default suffixes and having only the suffixes you need
.SUFFIXES:    # Delete the default suffixes
.SUFFIXES: .c .cpp .o .h       # Define our suffix list
Inference Rules: Inference rules are rules distinguished by the use of the character “%” in the dependency line. The “%” (rule character) is a wild card, matching zero or more characters. As an example, here is an inference rule for building .obj files from .c files:
%.obj : %.c
        $(CC) $(CFLAGS) –c $(.SOURCE)
4. Phony Targets
A phony target is one that is not really the name of the target file. It is a request for executing a set of commands that should not create the target file name. As the target file will never exist, the commands will be executed always e.g.
clean:
        rm *.o temp
You can also explicitely declare a target as phony using the special target .PHONY
.PHONY = clean
5. Comments
A comment starts with # character in a makefile
6. Substitution References
A substitution reference has the form $(file:.c=.o). The below example sets OBJFILES to a.o b.o c.o
SRCFILES = a.c b.c c.c
OBJFILES = $(SRCFILES:.c=.o)
SRCFILES = a.c b.c c.c
OBJFILES = $(SRCFILES:%.c=%.o)
Read more ...
The producer and consumer problem we visited earlier used CRITICAL_SECTION for synchronization and the threads were spinning and checking over the queue size to add or remove the elements. In this post, we are going to use Windows Event objects for synchronizing the Producer and Consumer threads.
Key Points
1. Events are kernel objects which contain an usage count, flag indicating the type of event (manual-reset or auto-reset) and another flag indicating the state (signaled or non-signaled)
2. Applications use Event Objects to notify the waiting threads that an operation has been completed
3. An event is signaled using the call SetEvent(Handle hEvent)
4. When a manual-reset event is signaled, all threads waiting on the event become schedulable. When an auto-reset event is signaled, only one of the threads waiting on the event becomes schedulable
Event uses five functions CreateEvent, OpenEvent, SetEvent, ResetEvent, and PulseEvent. The functions I will be using in my examples are:
HANDLE CreateEvent(
  LPSECURITY_ATTRIBUTES lpEventAttributes,
  BOOL bManualReset,
  BOOL bInitialState,
  LPCTSTR lpName
);
BOOL SetEvent(
  HANDLE hEvent
);
BOOL ResetEvent(
  HANDLE hEvent
);
The Event class below is a wrapper over windows manual-reset Event Object, provides easy interface to use and also takes care of the cleanup activities for the event handles.
#ifndef _Event_H_
#define _Event_H_

//File: Event.h

#include <windows.h>
#include <process.h>
#include <iostream>

namespace examples
{
    class Event : public NonCopyable
    {
    public:
        Event()
        {
            m_evt = (HANDLE) ::CreateEvent(0, true, false, 0);
            if(NULL == m_evt)
            {
                std::cout <<  "ERROR: Cannot create event" << std::endl;
            }
        }

        ~Event()
        {
            ::CloseHandle(m_evt);
        }

        bool wait(size_t timeout)
        {
            bool retval = false;

            switch(::WaitForSingleObjectEx(m_evt, timeout == 0 ? INFINITE : timeout, false))
            {
            case WAIT_OBJECT_0:
                retval = true;
                break;
            default:
                std::cout << "ERROR: Wait Failed " << ::GetLastError() << std::endl;
                break;
            }
            ::ResetEvent(m_evt);

            return retval;
        }

        bool signal()
        {
            return ::SetEvent(m_evt);
        }

    private:
        HANDLE m_evt;
    };
}

#endif //_Event_H_
The Shared Message Queue Class
#ifndef _MQ_H_
#define _MQ_H_

//File: MQ.h

#include <iostream>
#include <deque>
#include "Lock.h"
#include "Event.h"

using namespace std;

namespace examples
{
    class MQ
    {
    public:
        MQ(size_t size = 10) : m_max_size(size){}

        ~MQ()
        {
            m_q.clear();
        }

        void add(const string& elem)
        {
            m_qlock.acquire();
            while(isFull())
            {
                m_qlock.release();
                m_evtProducer.wait(0);
                m_qlock.acquire();
            }
            m_q.push_back(elem);
            debug_print("Producer");
            m_evtConsumer.signal();
            m_qlock.release();
        }

        void remove()
        {
            m_qlock.acquire();
            while(isEmpty())
            {
                m_qlock.release();
                m_evtConsumer.wait(0);
                m_qlock.acquire();
            }
            m_q.pop_front();
            debug_print("Consumer");
            m_evtProducer.signal();
            m_qlock.release();
        }

        bool isEmpty() const
        {
            return m_q.size() == 0;
        }

        bool isFull() const
        {
            return m_q.size() >= m_max_size - 1;
        }

    private:

        void debug_print(const std::string& str) const
        {
            std::cout << str.c_str() << "  [" << ::GetCurrentThreadId() << "] Size=[" << m_q.size() << "]";
            std::cout << endl;
        }

        const size_t   m_max_size;
        deque<const string>   m_q;
        Lock           m_qlock;
        Event          m_evtProducer;
        Event          m_evtConsumer;
    };

}

#endif //_MQ_H_
Read more ...
Continuing our series of sorting elements in a Collection, this post makes use of the Comparator interface to sort the objects.
Key Idea
The sort(List list, Comparator c) method sorts the specified (modifiable) list in the order specified by the comparator
The Employee Java Bean below makes use of the EmployeeNameComparator class to sort the Employee elements in the list. Also, note the use of NullSafeComparator
package com.samples;
public class Employee
{
private String empName = null;
private int empAge;
public Employee(String name, int age)
{
this.empName = name;
this.empAge = age;
}
public String getEmpName()
{
return empName;
}
public void setEmpName(String empName)
{
this.empName = empName;
}
public int getEmpAge()
{
return empAge;
}
public void setEmpAge(int empAge)
{
this.empAge = empAge;
}
}
package com.samples;
import java.awt.print.Printable;
import java.util.Arrays;
import java.util.Collections;
import java.util.Iterator;
import java.util.List;
public class EmployeeTest
{
public static void main(String args[])
{
Employee[] empArray = {
new Employee("Spiderman", 29),
new Employee("Superman", 30),
new Employee(null, 0),
new Employee("Batman", 35),
new Employee("Perry", 25)
};
List<Employee> list = Arrays.asList(empArray);
DebugPrint(list);
Collections.sort(list, new EmployeeNameComparator(new NullSafeComparator(new StringComparator(), true)));
DebugPrint(list);
Collections.sort(list, new EmployeeAgeComparator());
DebugPrint(list);
}
private static void DebugPrint(List<Employee> list)
{
System.out.println();
System.out.println("== DEBUG ==");
Iterator<Employee> itr = list.iterator();
while (itr.hasNext())
{
Employee emp = itr.next();
System.out.println("[Name]: " + emp.getEmpName() + "(" + emp.getEmpAge() + ")");
}
}
}
Important
The NullSafeComparator class prevents the program from crashing with NullPointerException when null is passed to the compareTo() function in StringComparator class. The class also takes care of the sorting of the null elements in the list
package com.samples;
import java.util.Comparator;
public class NullSafeComparator implements Comparator
{
private Comparator comparator;
private boolean nullsAreHigh;
public NullSafeComparator(Comparator comparator, boolean nullsAreHigh)
{
this.comparator = comparator;
this.nullsAreHigh = nullsAreHigh;
}
public int compare(Object o1, Object o2)
{
if(null == o1 && null == o2)return 0;
if(null == o1 && null != o2)return (nullsAreHigh ? 1 : -1);
if(null == o2 && null != o1)return (nullsAreHigh ? -1 : 1);
return comparator.compare(o1, o2);
}
}
package com.samples;
import java.util.Comparator;
public class EmployeeNameComparator implements Comparator<Employee>
{
private Comparator comparator;
public EmployeeNameComparator(Comparator comparator)
{
this.comparator = comparator;
}
public int compare(Employee o1, Employee o2)
{
return comparator.compare(o1.getEmpName(), o2.getEmpName());
}
}
package com.samples;
import java.util.Comparator;
public class StringComparator implements Comparator<String>
{
public int compare(String o1, String o2)
{
return o1.compareTo(o2);
}
}
package com.samples;
import java.util.Comparator;
public class EmployeeAgeComparator implements Comparator<Employee>
{
public EmployeeAgeComparator()
{
}
public int compare(Employee o1, Employee o2)
{
if(o1.getEmpAge() == o2.getEmpAge())
{
return 0;
}
return o1.getEmpAge() > o2.getEmpAge() ? 1 : -1;
}
}
The sample run of the program shows the Employee list sorted by name and then sorted by age.
Output: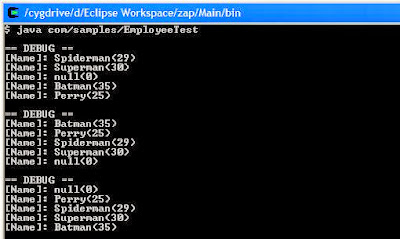
Read more ...
The Collections class in java provides the following methods for sorting the specified (modifiable) list. This post deals with the first method from the list.
void sort(List list)
void sort(List list, Comparator c)
Key Points
The sort(List list) method sorts the elements in ascending order according to the natural ordering of it's elements. The ordering is defined by implementing Comparable interface and overriding the compareTo() method. All the elements must implement Comparable interface and must be mutually comparable
Sorting elements using the Comparable Interface
The following example makes use of Person Java Bean to demonstrate the use of Comparable interface and sort in natural order
package com.samples;
public class Person implements Comparable<Person>
{
private String name;
private int age;
public Person(String name, int age)
{
this.name = name;
this.age = age;
}
public String getName()
{
return name;
}
public void setName(String name)
{
this.name = name;
}
public int getAge()
{
return age;
}
public void setAge(int age)
{
this.age = age;
}
Provides sorting algorithms with a comparison method for natural ordering
of Person elements
@Override
public int compareTo(Person p)
{
return this.name.compareTo(p.name);
}
}
package com.samples;
import java.util.Arrays;
import java.util.Collections;
import java.util.Iterator;
import java.util.List;
public class PersonTest
{
public static void main(String args[])
{
Person[] pArray = {
new Person("Superman", 30),
new Person("Spiderman", 35),
new Person("Hitman", 27),
new Person("Batman", 32),
new Person("Perry", 10)
};
List list = Arrays.asList(pArray);
DebugPrint(list);
Collections.sort(list);
DebugPrint(list);
}
private static void DebugPrint(List<Person> list)
{
System.out.println();
System.out.println("== DEBUG ==");
Iterator<Person> itr = list.iterator();
while (itr.hasNext())
{
Person p = itr.next();
System.out.println("[Name]: " + p.getName() + "(" + p.getAge() + ")");
}
}
}Output:
Read more ...
All Sql Server logins are stored in a system base table in master database. Whenever a new user is created, a corresponding entry is added in the system base table. There is a associated login entry for every user in system base table which also stores an associated SID (security identifier).
Key Idea
1. An orphan user is one which does not have an associated login entry in the System Base Tables (syslogins for sql server 2000 and sys.server_principals for sql server 2005+)
2. A user is also rendered orphan if the security identifier of the user does not match with the one stored in the system base tables in the master database
Orphaned users are generally created when you do either of the following:
1. Restore a database backup from one server to another
2. Restore an old copy of master database
3. Accidently remove a login belonging to a user
Reporting Orphaned Users
To see all the orphaned users in the database, execute the following query
sp_change_users_login 'report'
The orphan users if present will be shown as:
OrphanUser1 0x296D8B7BC71BA7459884FE8C17BFC32B
OrphanUser2 0x5F8AD799262298479F6F15FB07E9B0C6
Fixing Orphaned Users
To fix these orphaned users we have to relink the security identifier of the users with the security identifiers of the logins in the system base table. The below query helps fix and reset the password for the orphaned users
sp_change_users_login 'auto_fix', 'OrphanUser1', null, 'OrphanUser1'
sp_change_users_login 'auto_fix', 'OrphanUser2', null, 'OrphanUser2'
The above queries will add the login entries if not already present with the given password. In case the login entries are already present, you can use the shorter version of the above queries to fix the problem
sp_change_users_login 'auto_fix', 'OrphanUser1'
sp_change_users_login 'auto_fix', 'OrphanUser2'
Note: You may observe the following error: An invalid parameter or option was specified for procedure 'sys.sp_change_users_login' if you are using 'Auto_Fix' as the action instead of 'auto_fix'
References:
Troubleshooting Orphaned Users
MSDN: System Base Tables
Fixing Orphaned Users
Read more ...
Key Points
1. Only the thread which acquires the mutex can release the mutex successfully.
2. A binary semaphore (semaphore with a count of 1) is similar to mutex but allows other threads to release it.
A thread which owns a mutex can acquire the same mutex recursively without blocking it's execution. This prevents the thread from deadlocking itself while waiting for the mutex it already owns. To release it's ownership under such circumstances, the thread must release the mutex the same number of times it acquired it.
A semaphore is a synchronization object which maintains a count between zero and a maximum value. The count is decremented each time a thread acquires a semaphore and incremented when a thread releases the semaphore. When the semaphore count reaches 0, the thread attempting to acquire the semaphore will be blocked unless some other thread increments it. Thus, a semaphore is useful in limiting the number of threads sharing a resource.
Read more ...
In my earlier post Thread Synchronization in Windows using Critical Section, I have used Windows Critical Section as Locks for synchronizing the threads. This post talks about using Windows Mutex as synchronization objects and demonstrates it's use with a simple example. Windows functions related with Mutexes are CreateMutex, ReleaseMutex and OpenMutex
HANDLE CreateMutex(
  LPSECURITY_ATTRIBUTES lpMutexAttributes,
  BOOL bInitialOwner,
  LPCTSTR lpName
);
BOOL ReleaseMutex(
HANDLE hMutex
); HANDLE WINAPI OpenMutex(
DWORD dwDesiredAccess,
BOOL bInheritHandle,
LPCTSTR lpName
);
Key Points
1. A thread acquires a mutex by calling WaitForSingleObject(HANDLE hMutex, DWORD dwMilliseconds);
2. A thread releases mutes by calling ReleaseMutex(HANDLE hMutex);
3. The WaitForSingleObject call returns when the specified object is in the signaled state or when the time out interval has lapsed
The MutexLock class implementation using Windows Mutex synchronization Object
#ifndef _MutexLock_H_
#define _MutexLock_H_
#include <windows.h>
#include <process.h>
#include <iostream>
#include "NonCopyable.h"
namespace examples
{
class MutexLock : public NonCopyable
{
public:
MutexLock()
{
m_hMutex = (HANDLE) ::CreateMutex(0, 0, 0);
if(NULL == m_hMutex)
{
std::cout << "ERROR: Cannot create mutex" << std::endl;
}
}
~MutexLock()
{
::CloseHandle(m_hMutex);
}
void acquire()
{
if(::WaitForSingleObject(m_hMutex, INFINITE) != WAIT_OBJECT_0)
{
std::cout << "ERROR: Cannot acquire mutex" << std::endl;
}
}
bool tryAcquire(size_t timeOut)
{
bool retval = false;
switch(::WaitForSingleObject(m_hMutex, timeOut))
{
case WAIT_OBJECT_0:
retval = true;
break;
case WAIT_TIMEOUT:
std::cout << "ERROR: Cannot acquire mutex" << std::endl;
break;
default:
std::cout << "ERROR: Cannot acquire mutex" << std::endl;
break;
}
return retval;
}
void release()
{
if(::ReleaseMutex(m_hMutex) == 0)
{
std::cout << "ERROR: Cannot release mutex" << std::endl;
}
}
private:
HANDLE m_hMutex;
};
}
#endif
Read more ...
Above is class diagram for a simple producer/consumer problem
#include <iostream>
#include "MQ.h"
#include "Thread.h"
#include "Runnable.h"
#include "ProductionTask.h"
#include "ConsumptionTask.h"
using namespace examples;
int main()
{
try
{
MQ q(10);
ProductionTask producerTask(q);
ConsumptionTask consumerTask(q);
Thread t[2] = { producerTask, consumerTask };
t[0].start();
t[1].start();
t[0].join(50000);
t[1].join(50000);
std::cout << std::endl
<< "Threads timed out!!" << std::endl;
}catch(std::exception& e)
{
std::cerr << e.what() << std::endl;
}catch(...)
{
std::cerr << "Unknown Exception" << std::endl;
}
return 0;
}
Key Features
1. Threads are Tasks are decoupled. A thread can execute any task provided it implements the Runnable interface.
2. Windows threads are encapsulated using the technique demonstrated in the earlier blog post Encapsulating Windows Threads in C++ Objects
3. Two Tasks ProductionTask and ConsumptionTask share the common MQ instance q and try to execute add and remove operations on q concurrently. Synchronization is achieved here by means of Lock implemented using Windows CRITICAL_SECTION
4. The threads are allowed to run for 50 seconds before they are terminated. This is not a graceful termination and in real world applications may lead to unexpected results
#ifndef _Runnable_H_
#define _Runnable_H_
#include <iostream>
#include "NonCopyable.h"
namespace examples
{
class Runnable
{
public:
virtual ~Runnable(){}
virtual void run() = 0;
};
}
#endif
#ifndef _ConsumptionTask_H_
#define _ConsumptionTask_H_
#include "Runnable.h"
#include "MQ.h"
namespace examples
{
class ConsumptionTask : public Runnable
{
public:
ConsumptionTask(MQ &q);
~ConsumptionTask();
virtual void run();
private:
MQ& m_queue;
};
}
#endif
#include "ConsumptionTask.h"
using namespace examples;
ConsumptionTask::ConsumptionTask(MQ &q) : m_queue(q)
{}
ConsumptionTask::~ConsumptionTask()
{}
void ConsumptionTask::run()
{
while(true)
{
m_queue.remove();
::Sleep(550);
}
}
#ifndef _ProductionTask_H_
#define _ProductionTask_H_
#include "Runnable.h"
#include "MQ.h"
namespace examples
{
class ProductionTask : public Runnable
{
public:
ProductionTask(MQ &q);
~ProductionTask();
virtual void run();
private:
MQ& m_queue;
};
}
#endif
#include "ProductionTask.h"
using namespace examples;
ProductionTask::ProductionTask(MQ &q) : m_queue(q)
{}
ProductionTask::~ProductionTask()
{}
void ProductionTask::run()
{
while(true)
{
m_queue.add("Object");
::Sleep(500);
}
}
Read more ...
|
|


